How to Deploy OpenObserve on DigitalOcean: A Complete Guide




Ready to get started?
Try OpenObserve Cloud today for more efficient and performant observability.
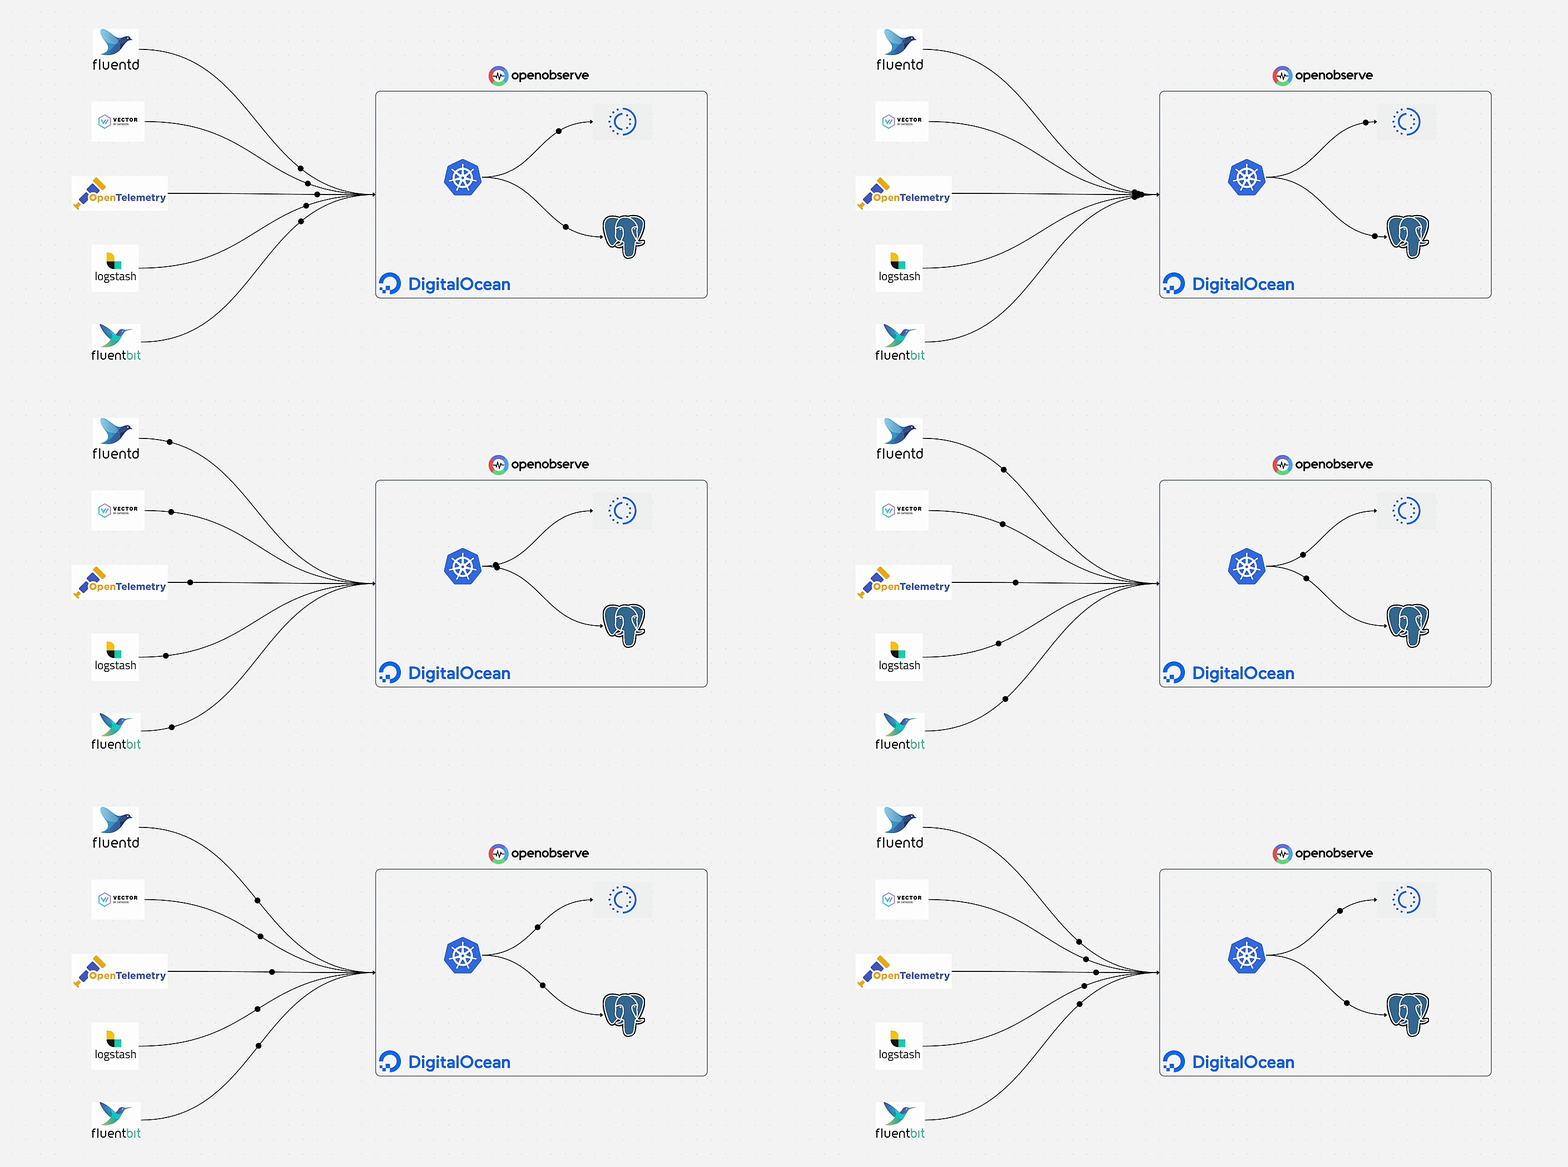
OpenObserve is a cloud-native observability platform designed for logs, metrics, and traces. While it's easy to get started with OpenObserve locally, deploying it in production requires careful consideration of storage, database, and orchestration. In this guide, I'll walk you through deploying OpenObserve on DigitalOcean using Kubernetes, leveraging managed services for reliability and scalability.
Architecture Overview
Our deployment architecture includes:
- DigitalOcean Kubernetes (DOKS): Managed Kubernetes cluster for running OpenObserve
- DigitalOcean Spaces: S3-compatible object storage for log data
- DigitalOcean Managed PostgreSQL: Metadata and configuration storage
- Helm: Package manager for Kubernetes deployment
This setup provides a production-ready, scalable observability platform with minimal operational overhead.
Prerequisites
Before you begin, ensure you have:
- A DigitalOcean account with billing enabled
kubectlinstalled locallyhelm(v3+) installed locallydoctl(DigitalOcean CLI) installed and configured- Basic familiarity with Kubernetes concepts
Step 1: Create DigitalOcean Spaces
DigitalOcean Spaces provides S3-compatible object storage, which OpenObserve uses for storing log data efficiently.
Create the Space
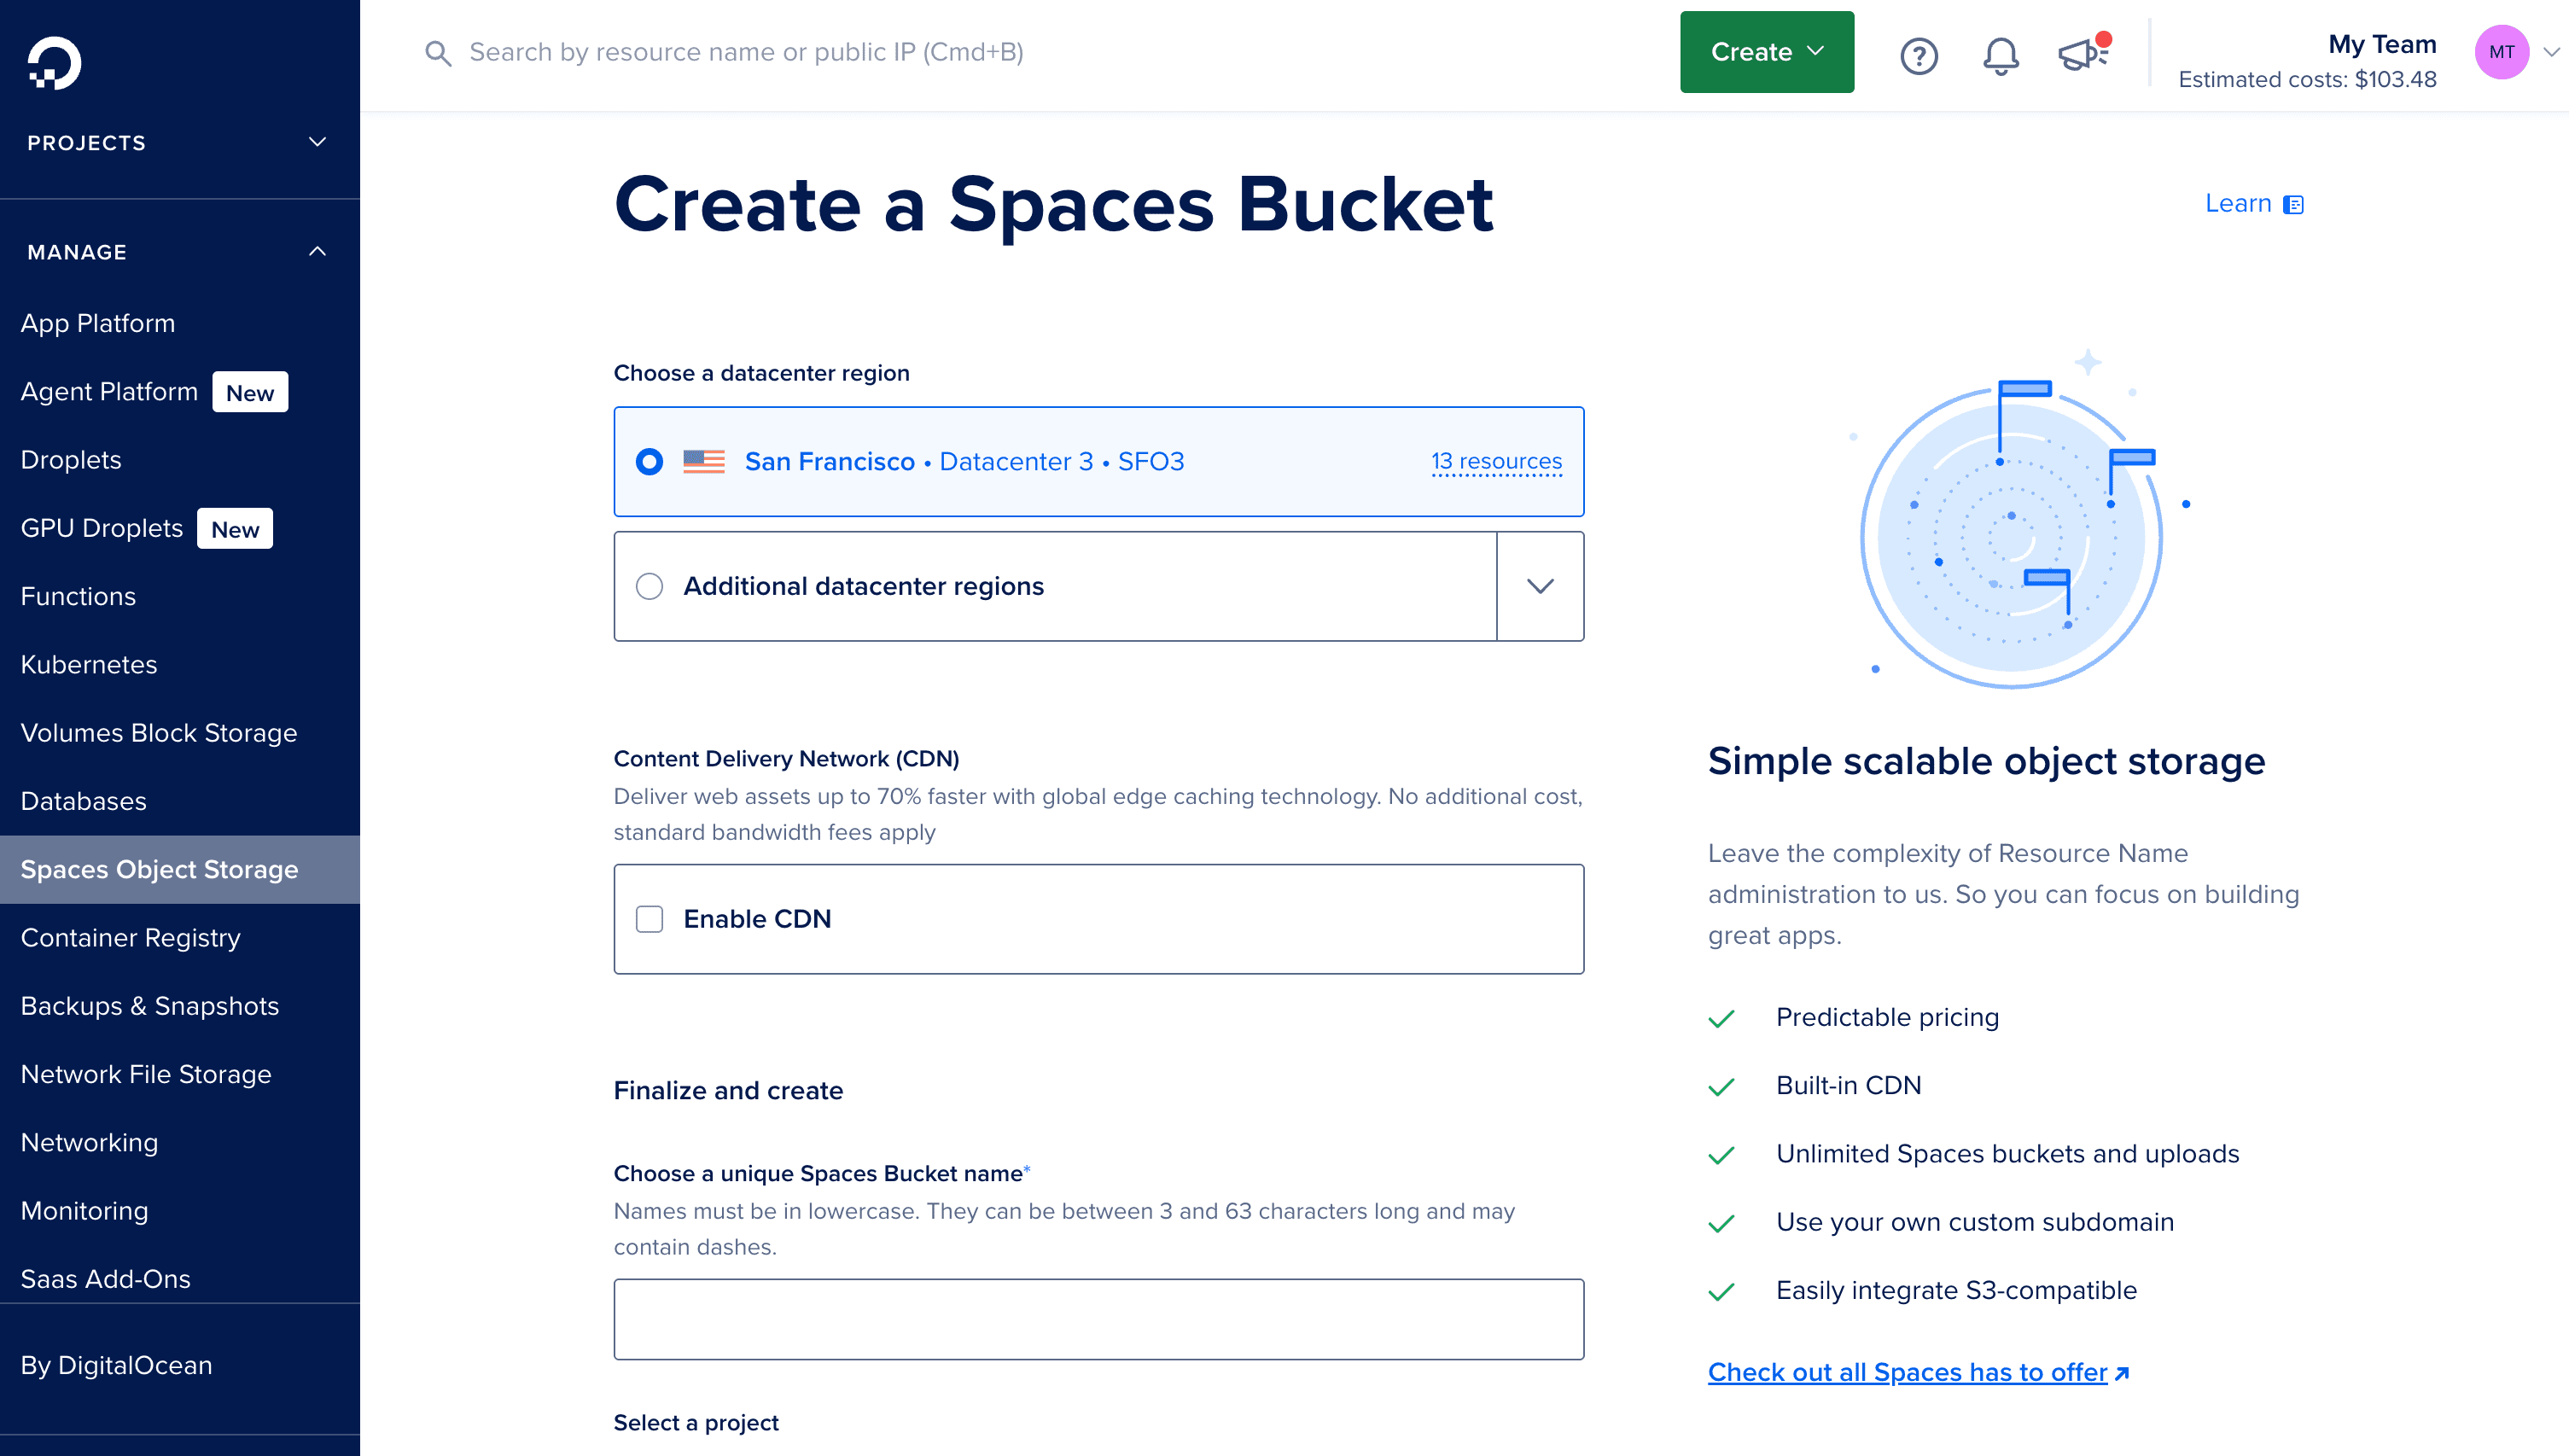
Log in to your DigitalOcean dashboard
Navigate to Spaces Ob in the left sidebar
Click Create a Space
Configure your Space:
- Datacenter region: Choose a region close to your users (e.g.,
nyc3,sfo3) - Enable CDN: Optional, based on your access patterns
- Space name:
openobserve-logs(must be globally unique) - File listing: Choose based on security requirements
- Datacenter region: Choose a region close to your users (e.g.,
Click Create a Space
Generate Access Keys
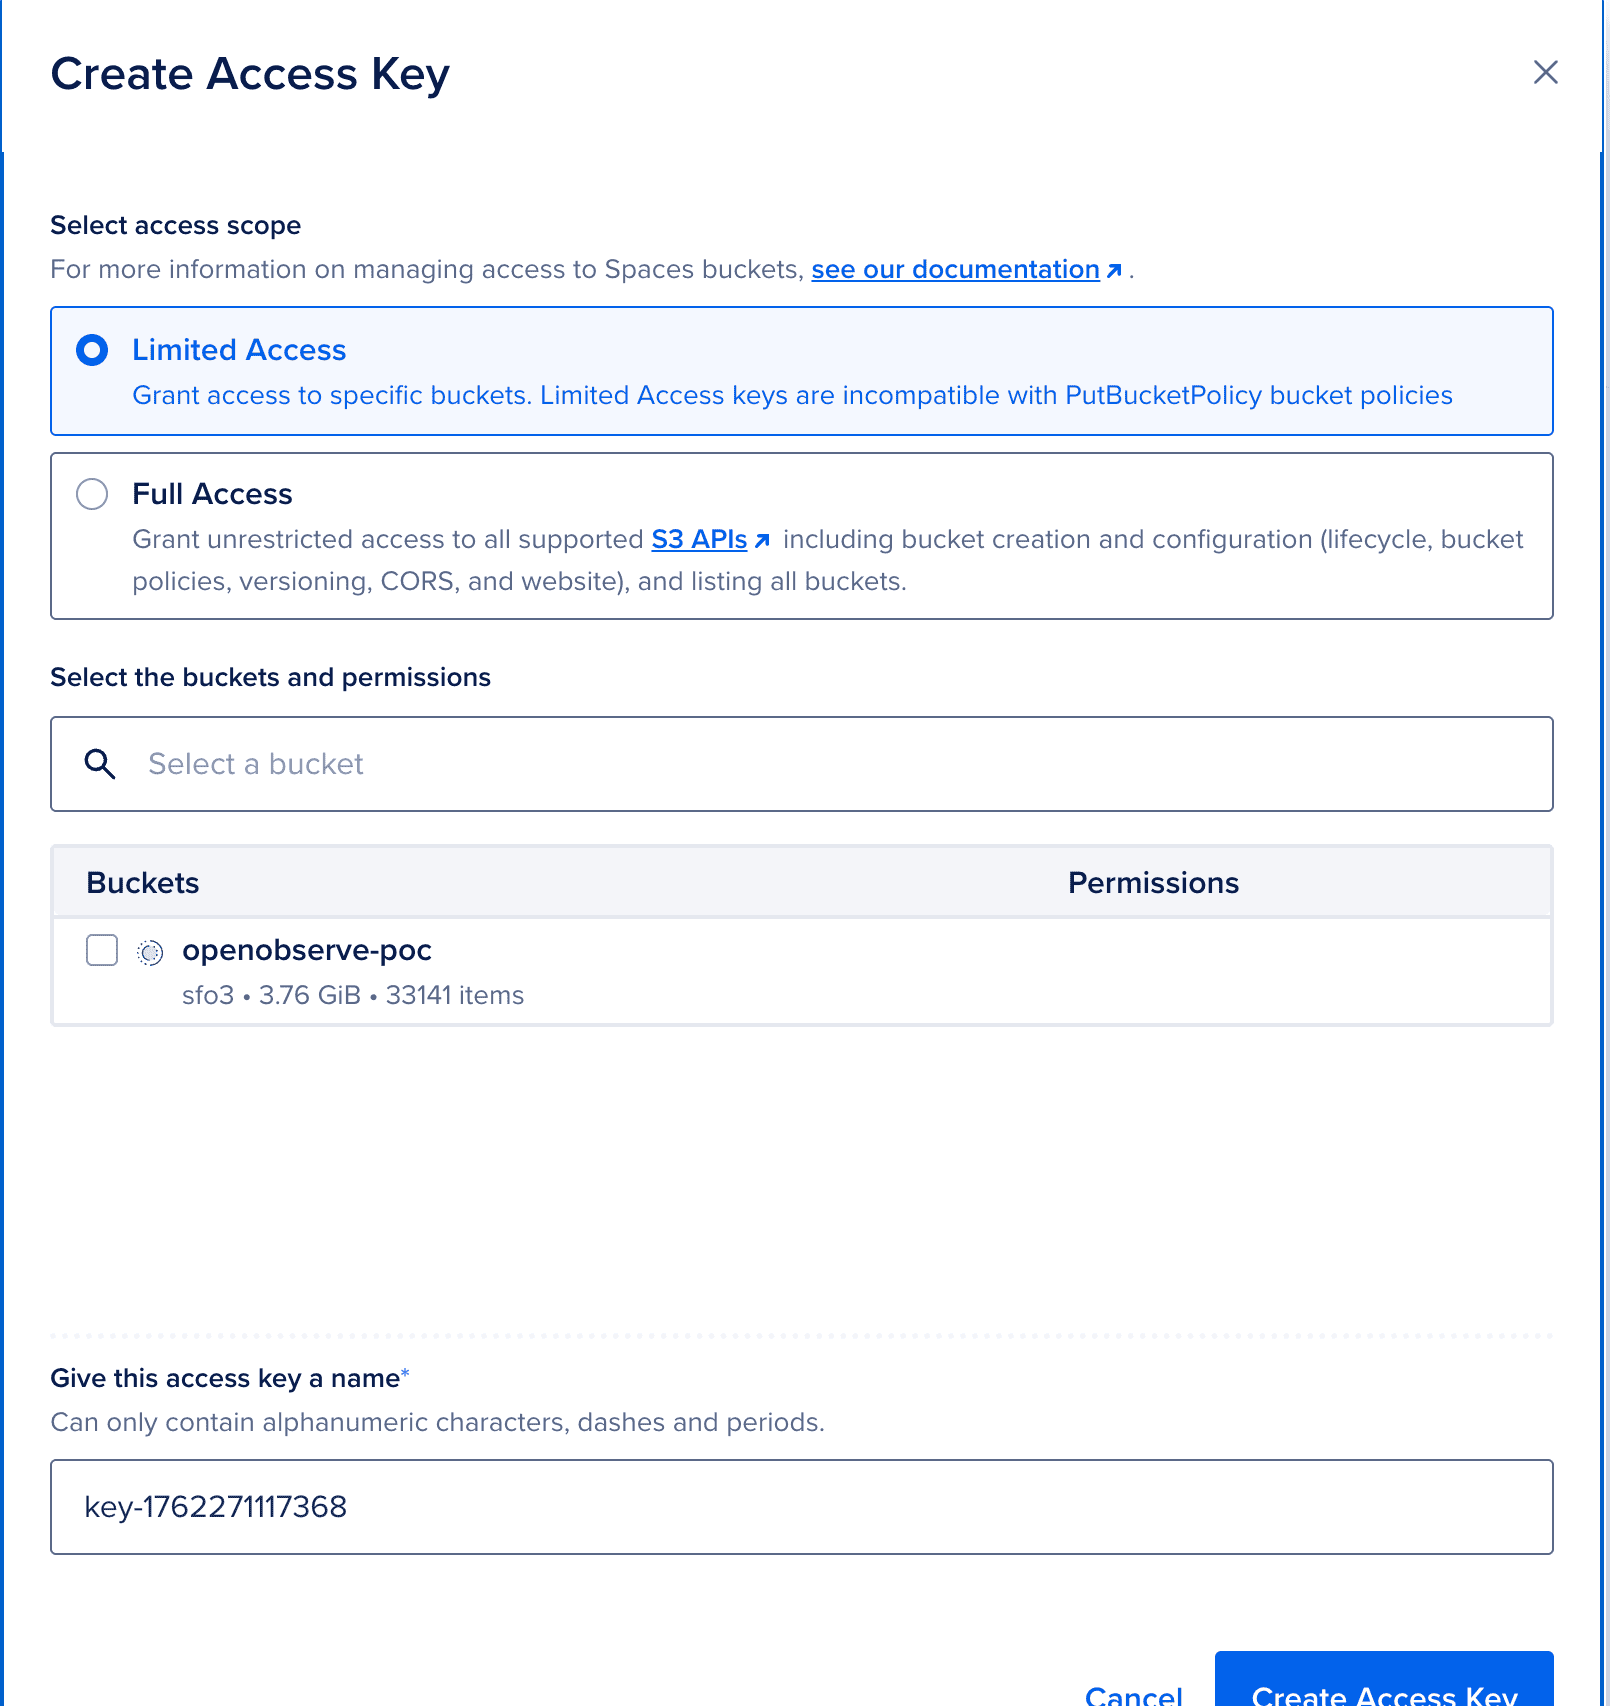
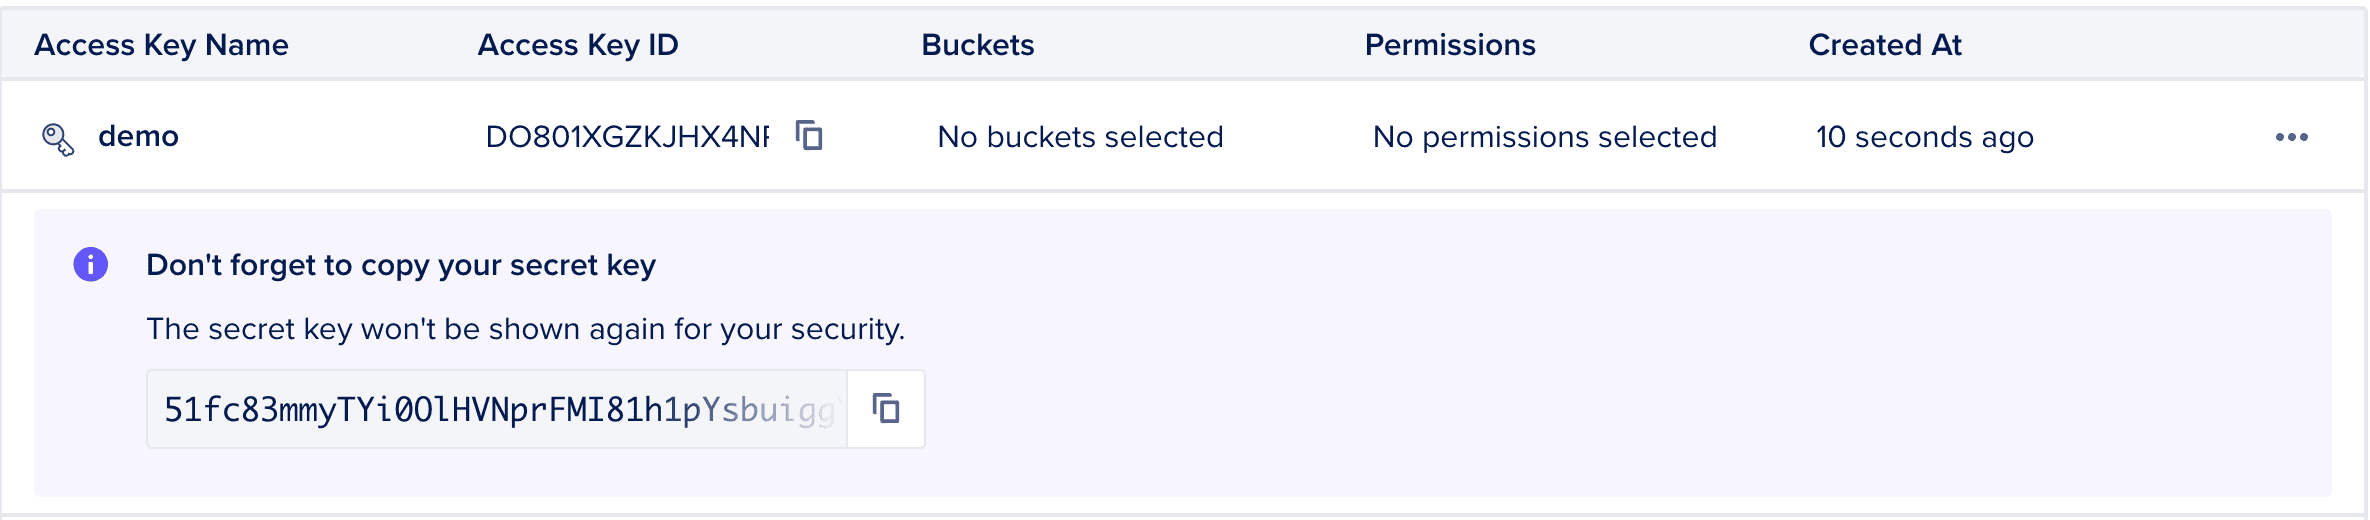
- Navigate to API → Spaces Keys
- Click Generate New Key
- Provide a name:
openobserve-spaces-key - Save the Access Key and Secret Key securely - you'll need these later
Note Your Endpoint
Your Spaces endpoint follows this format:
https://<spacename>.<region>.digitaloceanspaces.com
For example, if you created your Space in nyc3 called test:
https://test.nyc3.digitaloceanspaces.com
Step 2: Create a Kubernetes Cluster
DigitalOcean's managed Kubernetes service (DOKS) simplifies cluster management and provides automatic updates.
Using the Dashboard
Navigate to Kubernetes in the left sidebar
Click Create a Kubernetes Cluster
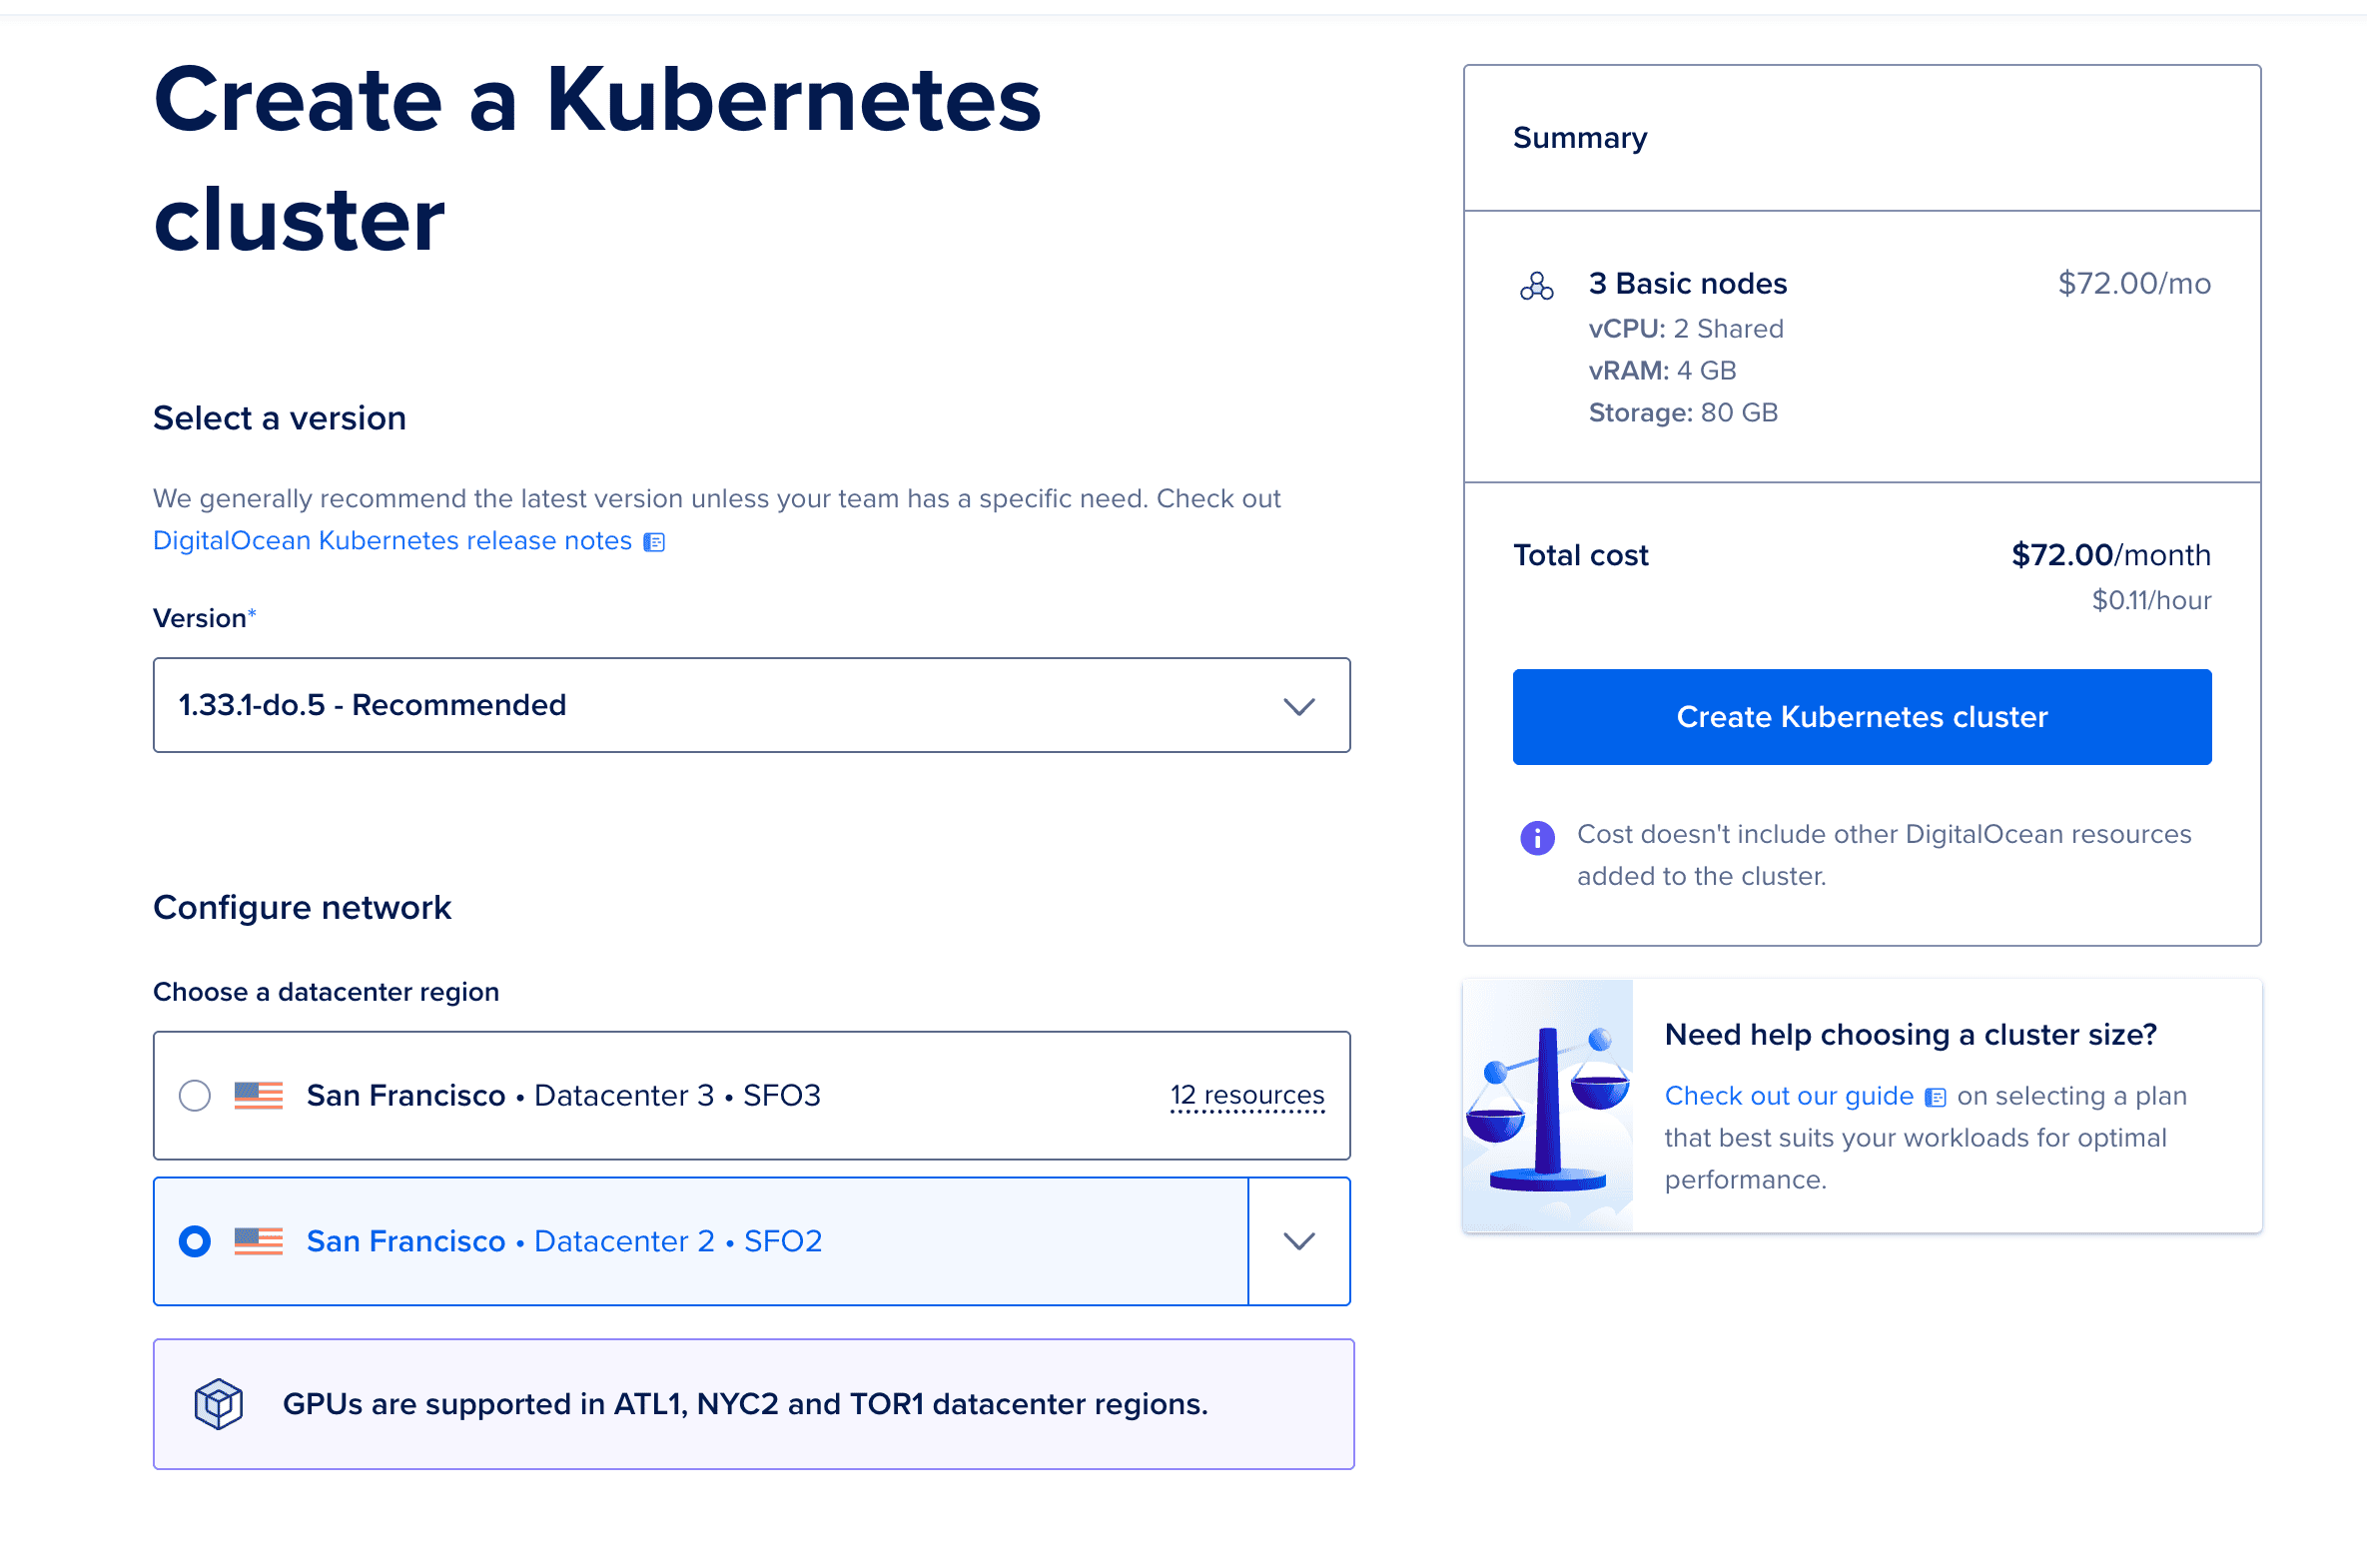
Configure the cluster:
- Kubernetes version: Use the latest stable version (e.g., 1.28.x)
- Datacenter region: Same region as your Spaces for better performance
- VPC Network: Use the default VPC or create a new one
- Cluster capacity:
- Node pool name:
openobserve-pool - Machine type: Start with
s-2vcpu-4gb(2 vCPU, 4GB RAM) - Node count: 3 (for high availability)
- Node pool name:
- Cluster name:
openobserve-cluster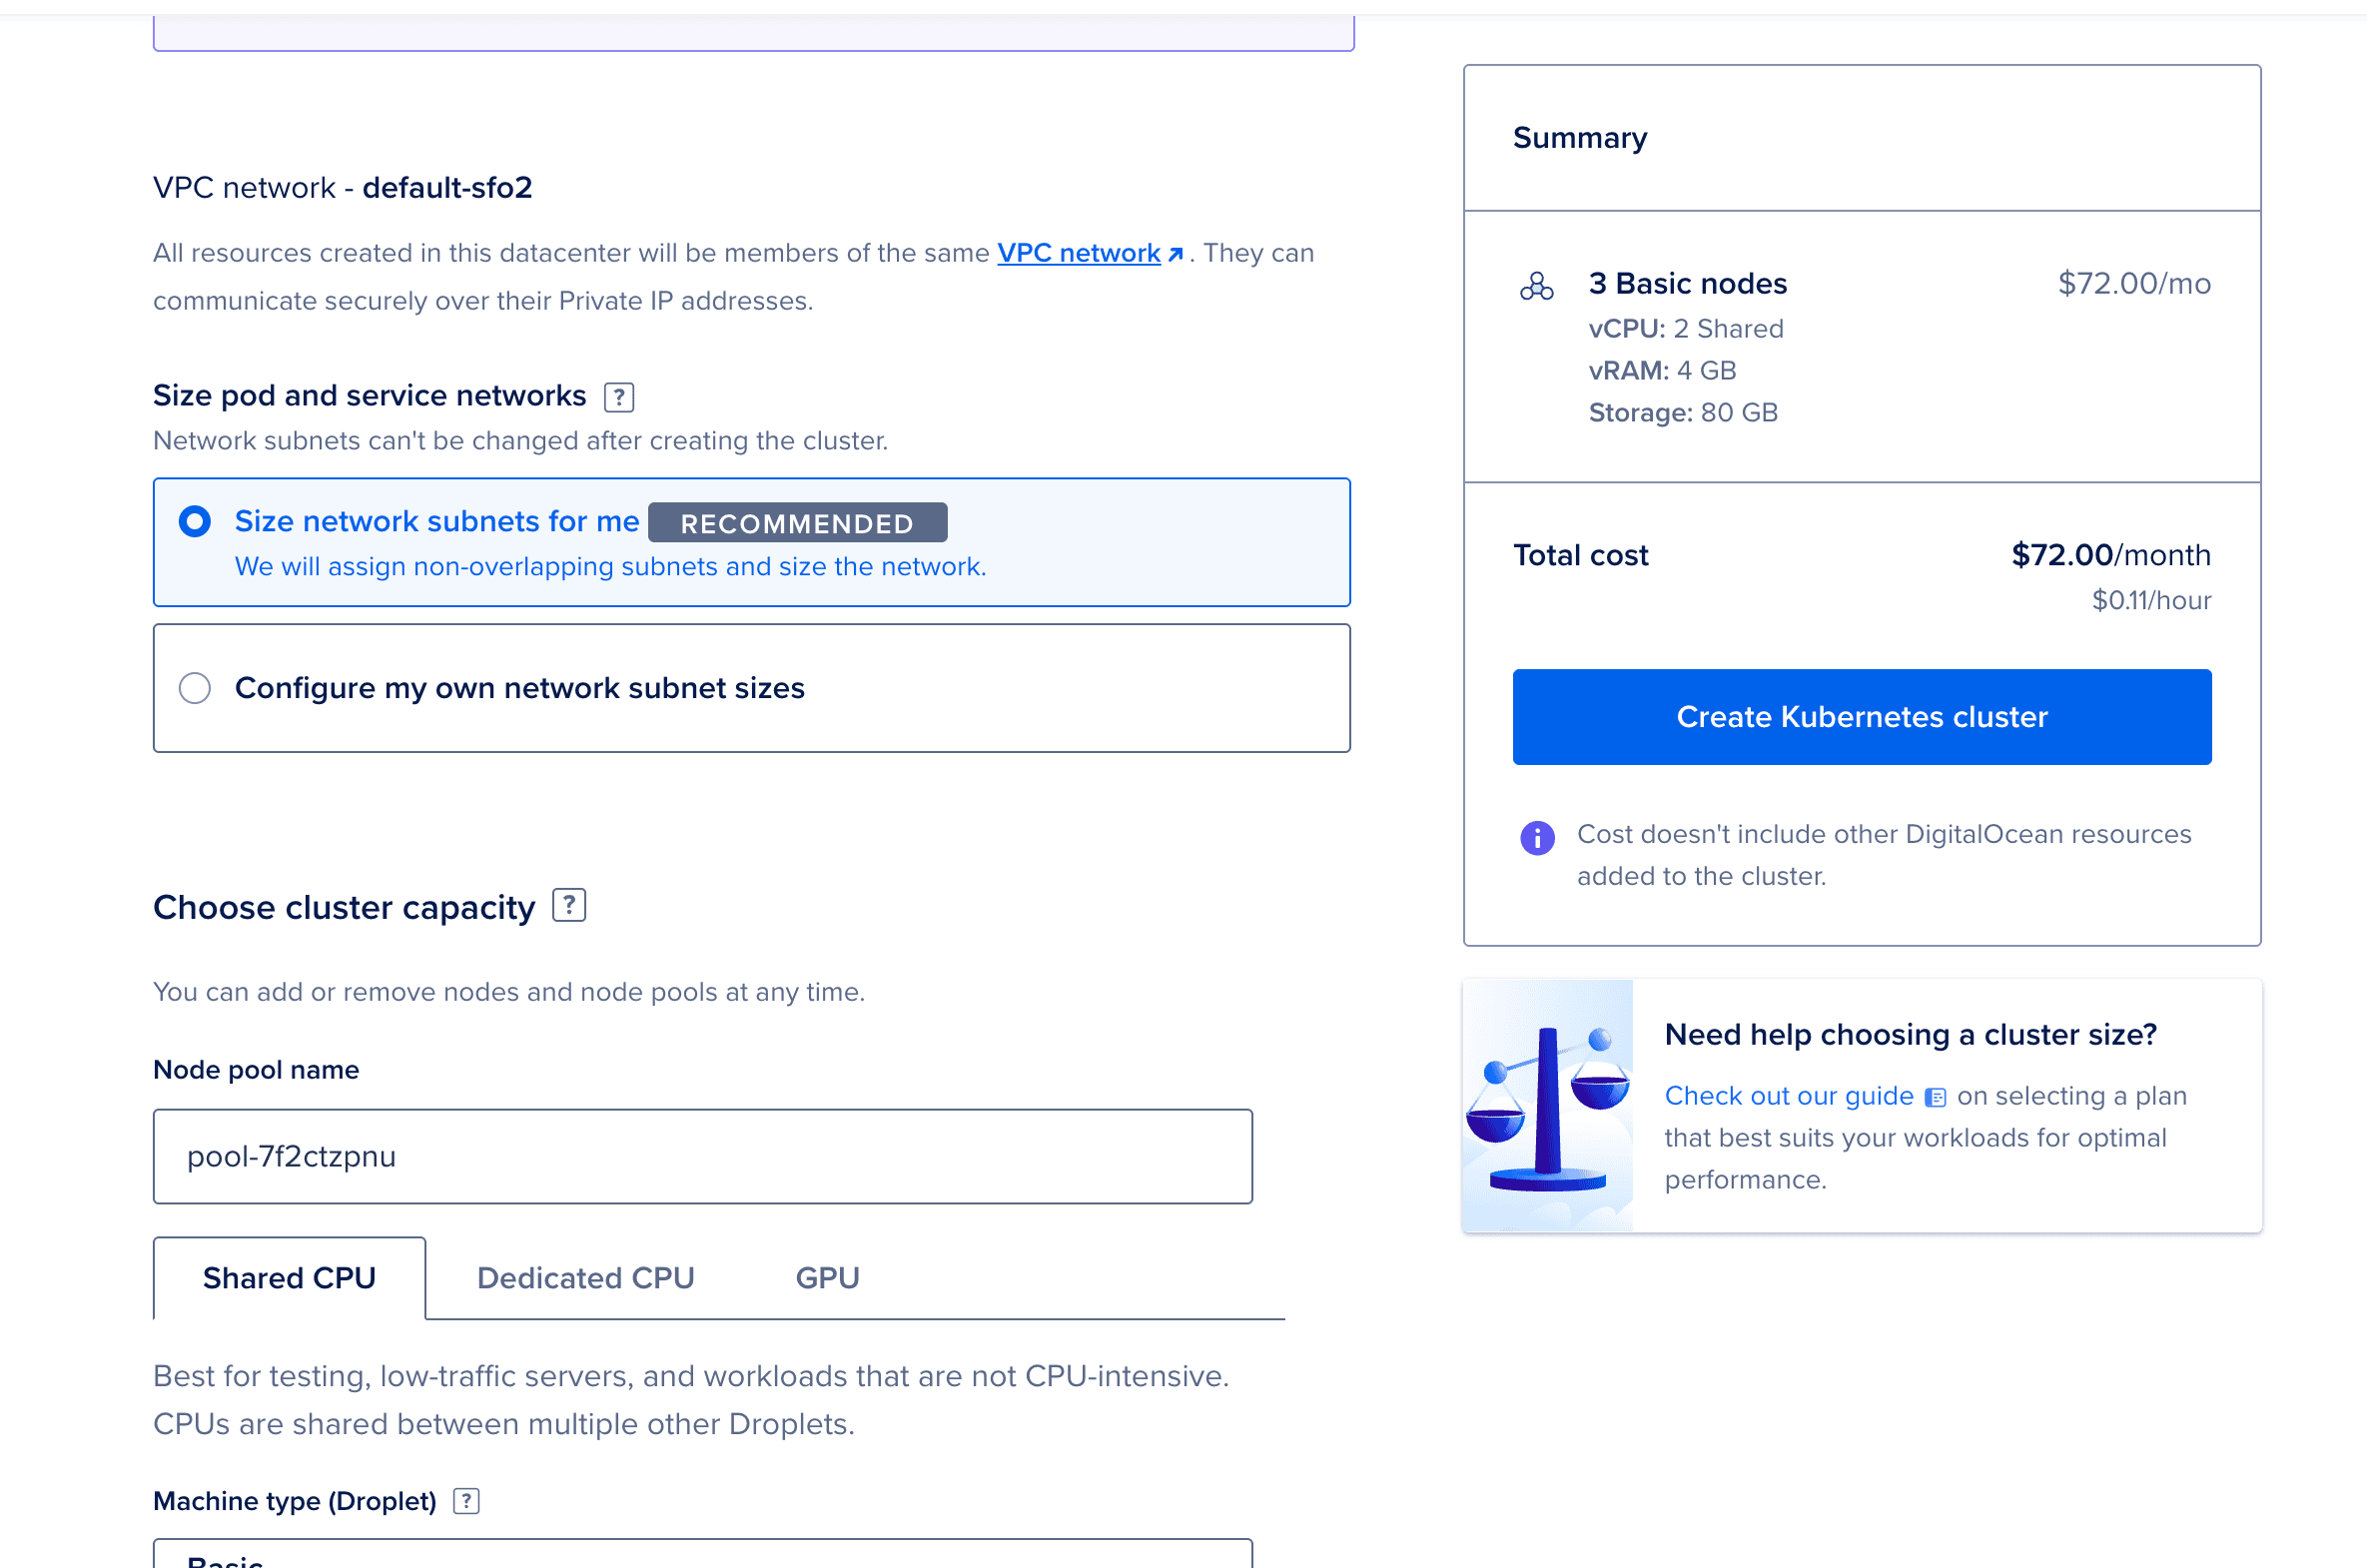
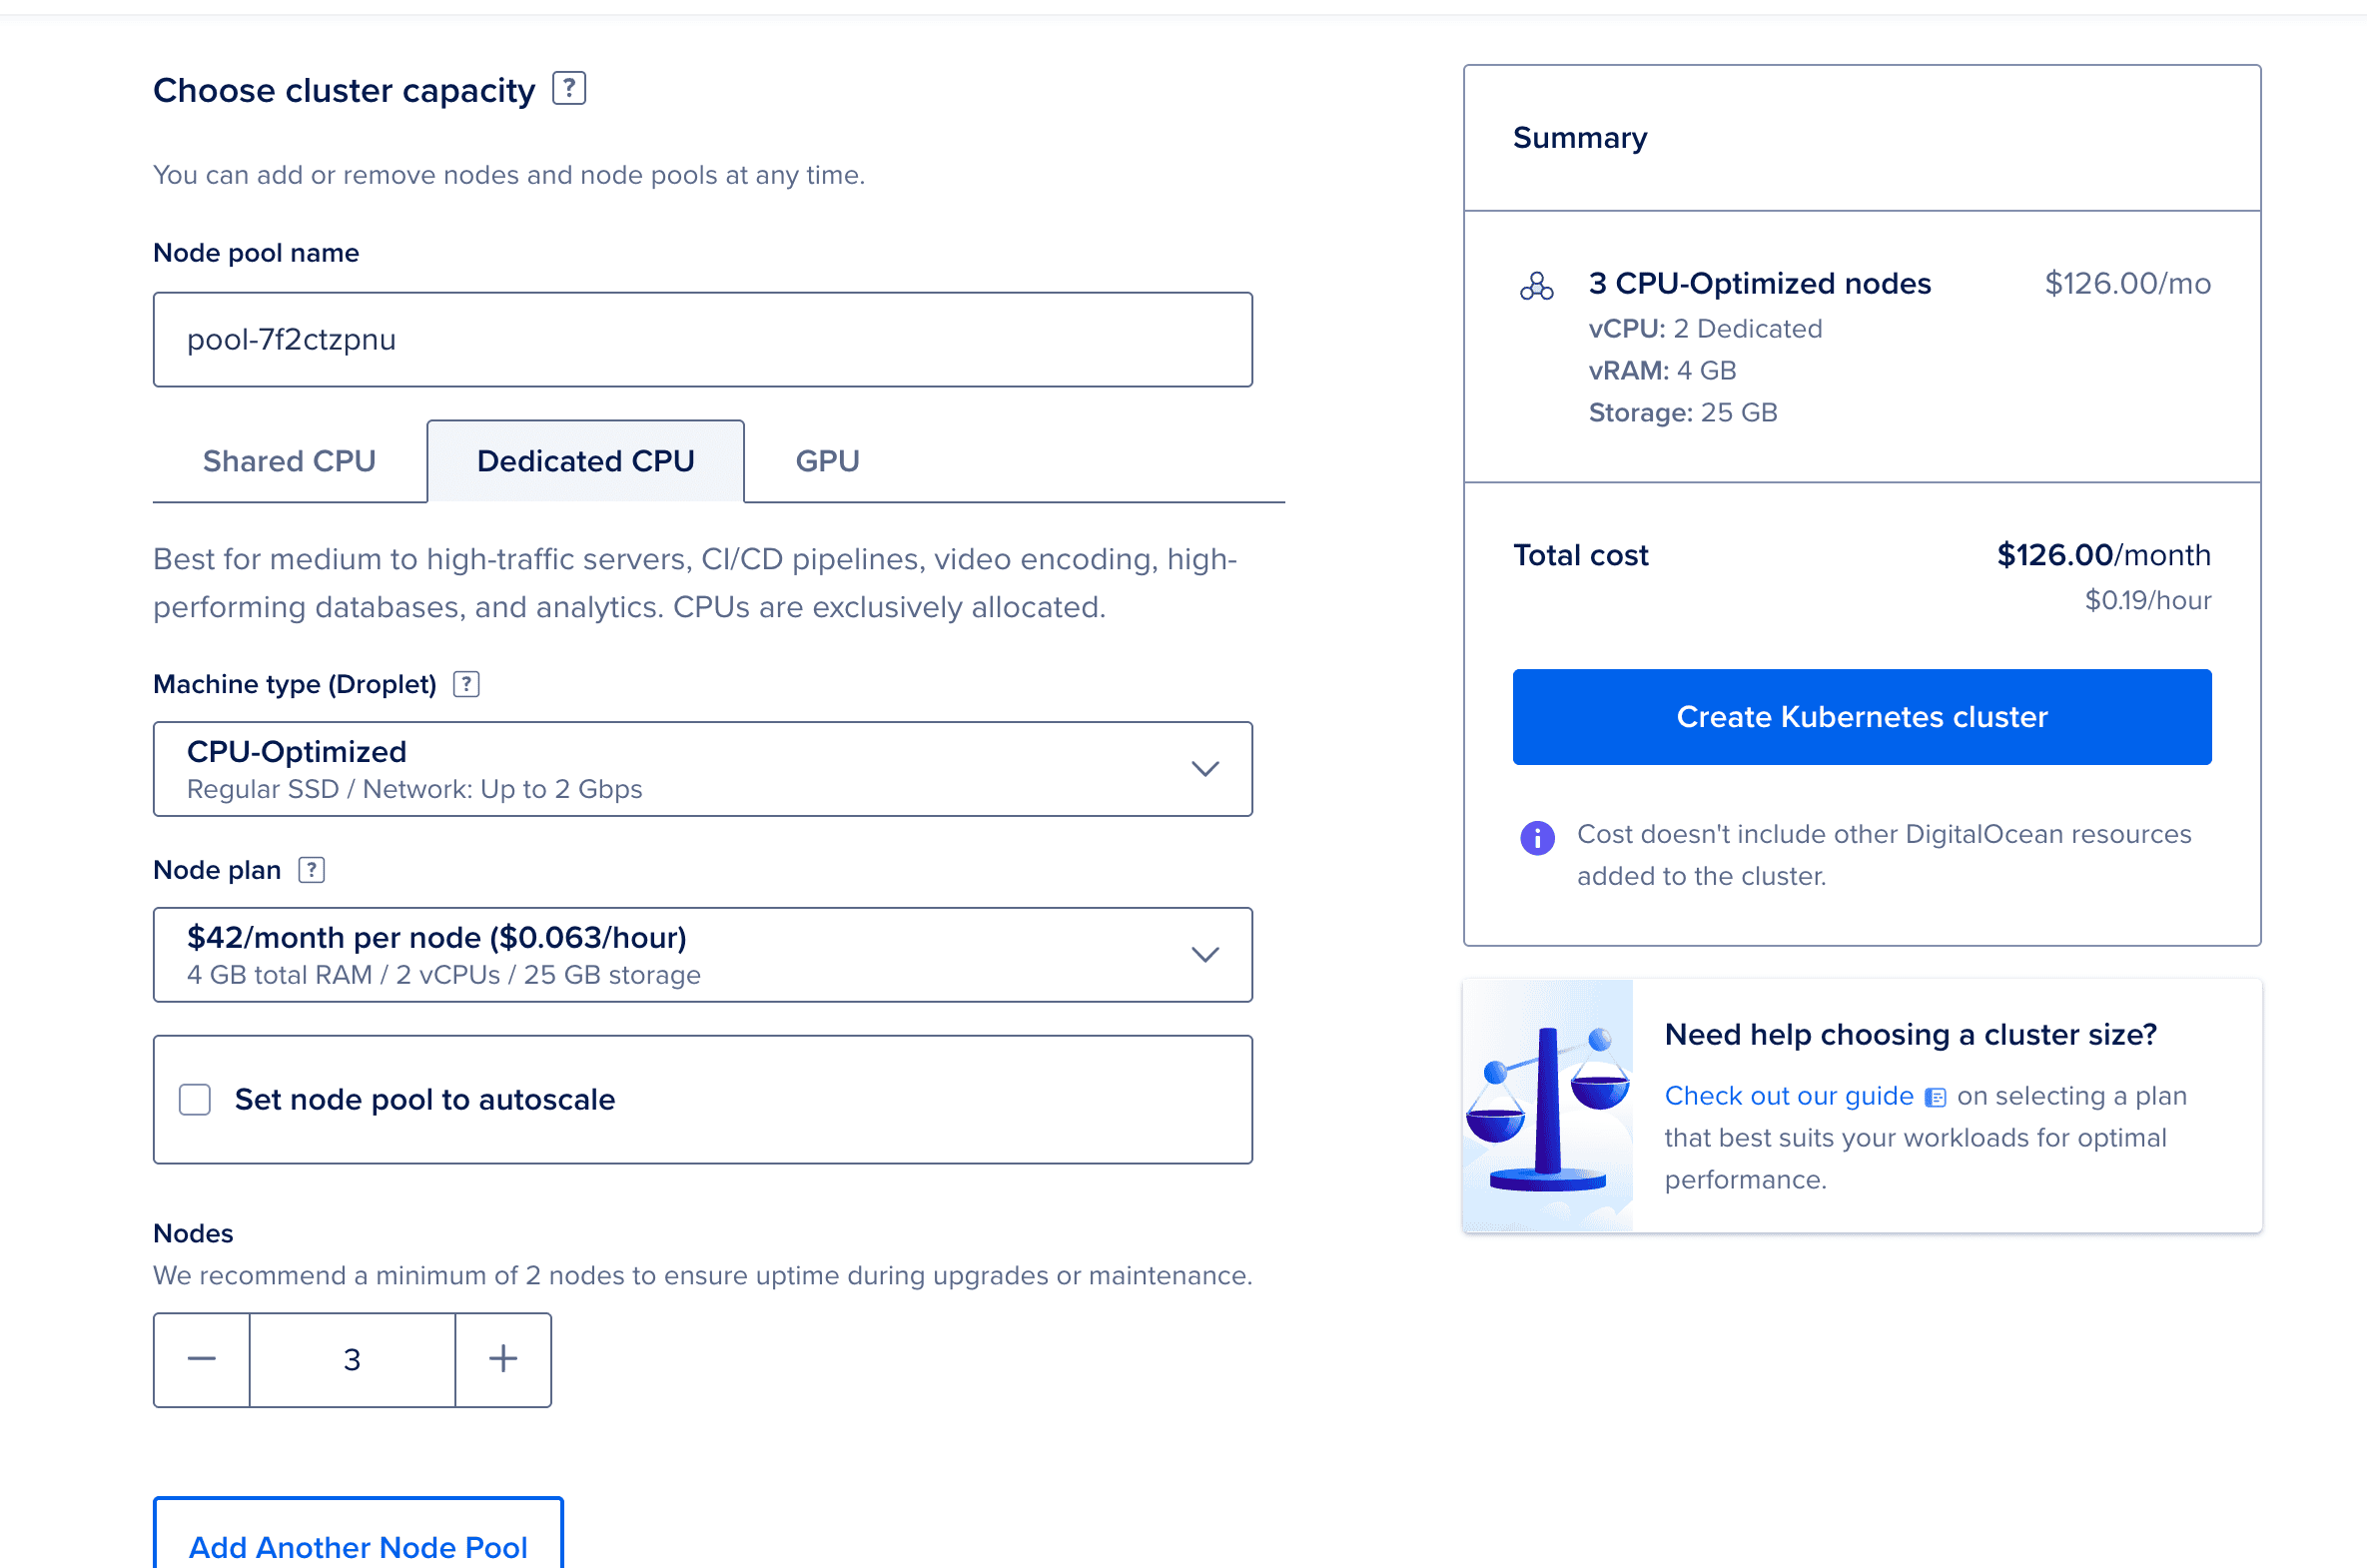
Click Create Cluster
The cluster provisioning takes 4-5 minutes. While it's being created, you can proceed to the next step.
Configure kubectl Access
Once the cluster is ready:
- Download the kubeconfig file from the cluster dashboard, or
- Use
doctl: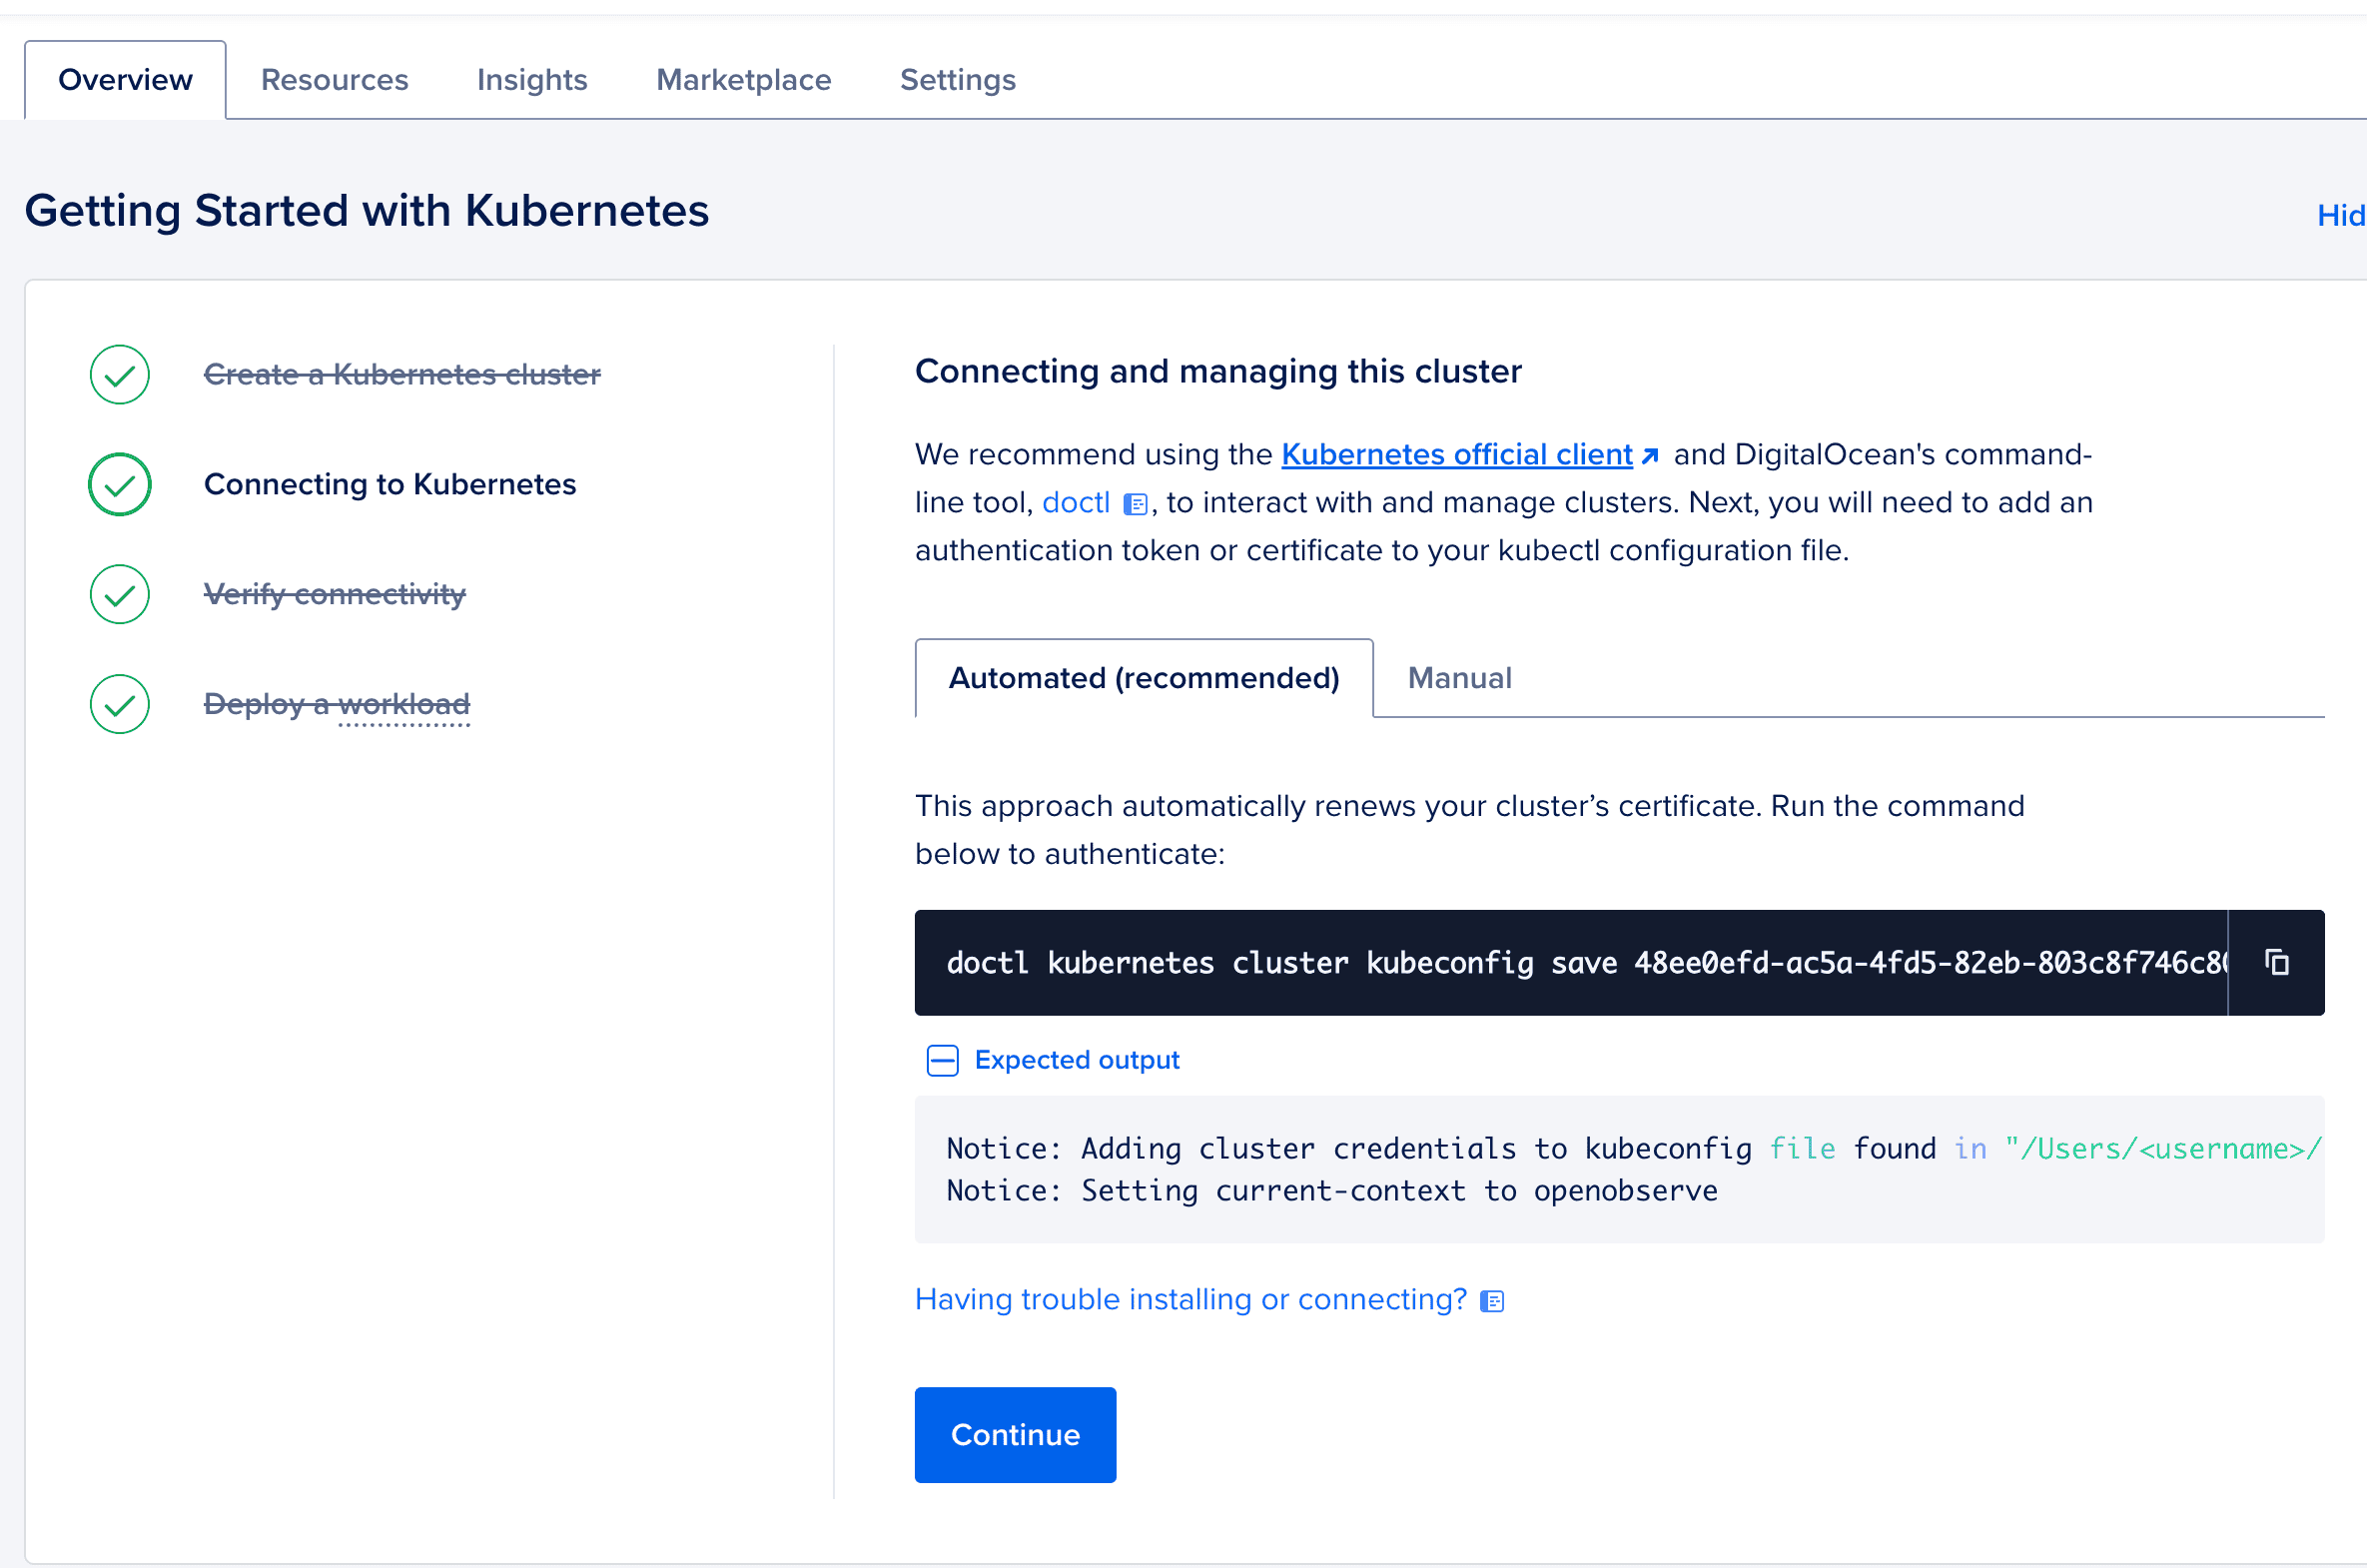
doctl kubernetes cluster kubeconfig save openobserve-cluster
Verify connectivity:
kubectl get nodes
You should see your three nodes in a Ready state.
Step 3: Create Managed PostgreSQL Database
OpenObserve uses PostgreSQL for storing metadata, user information, and configuration.
Create the Database
Navigate to Databases in the left sidebar
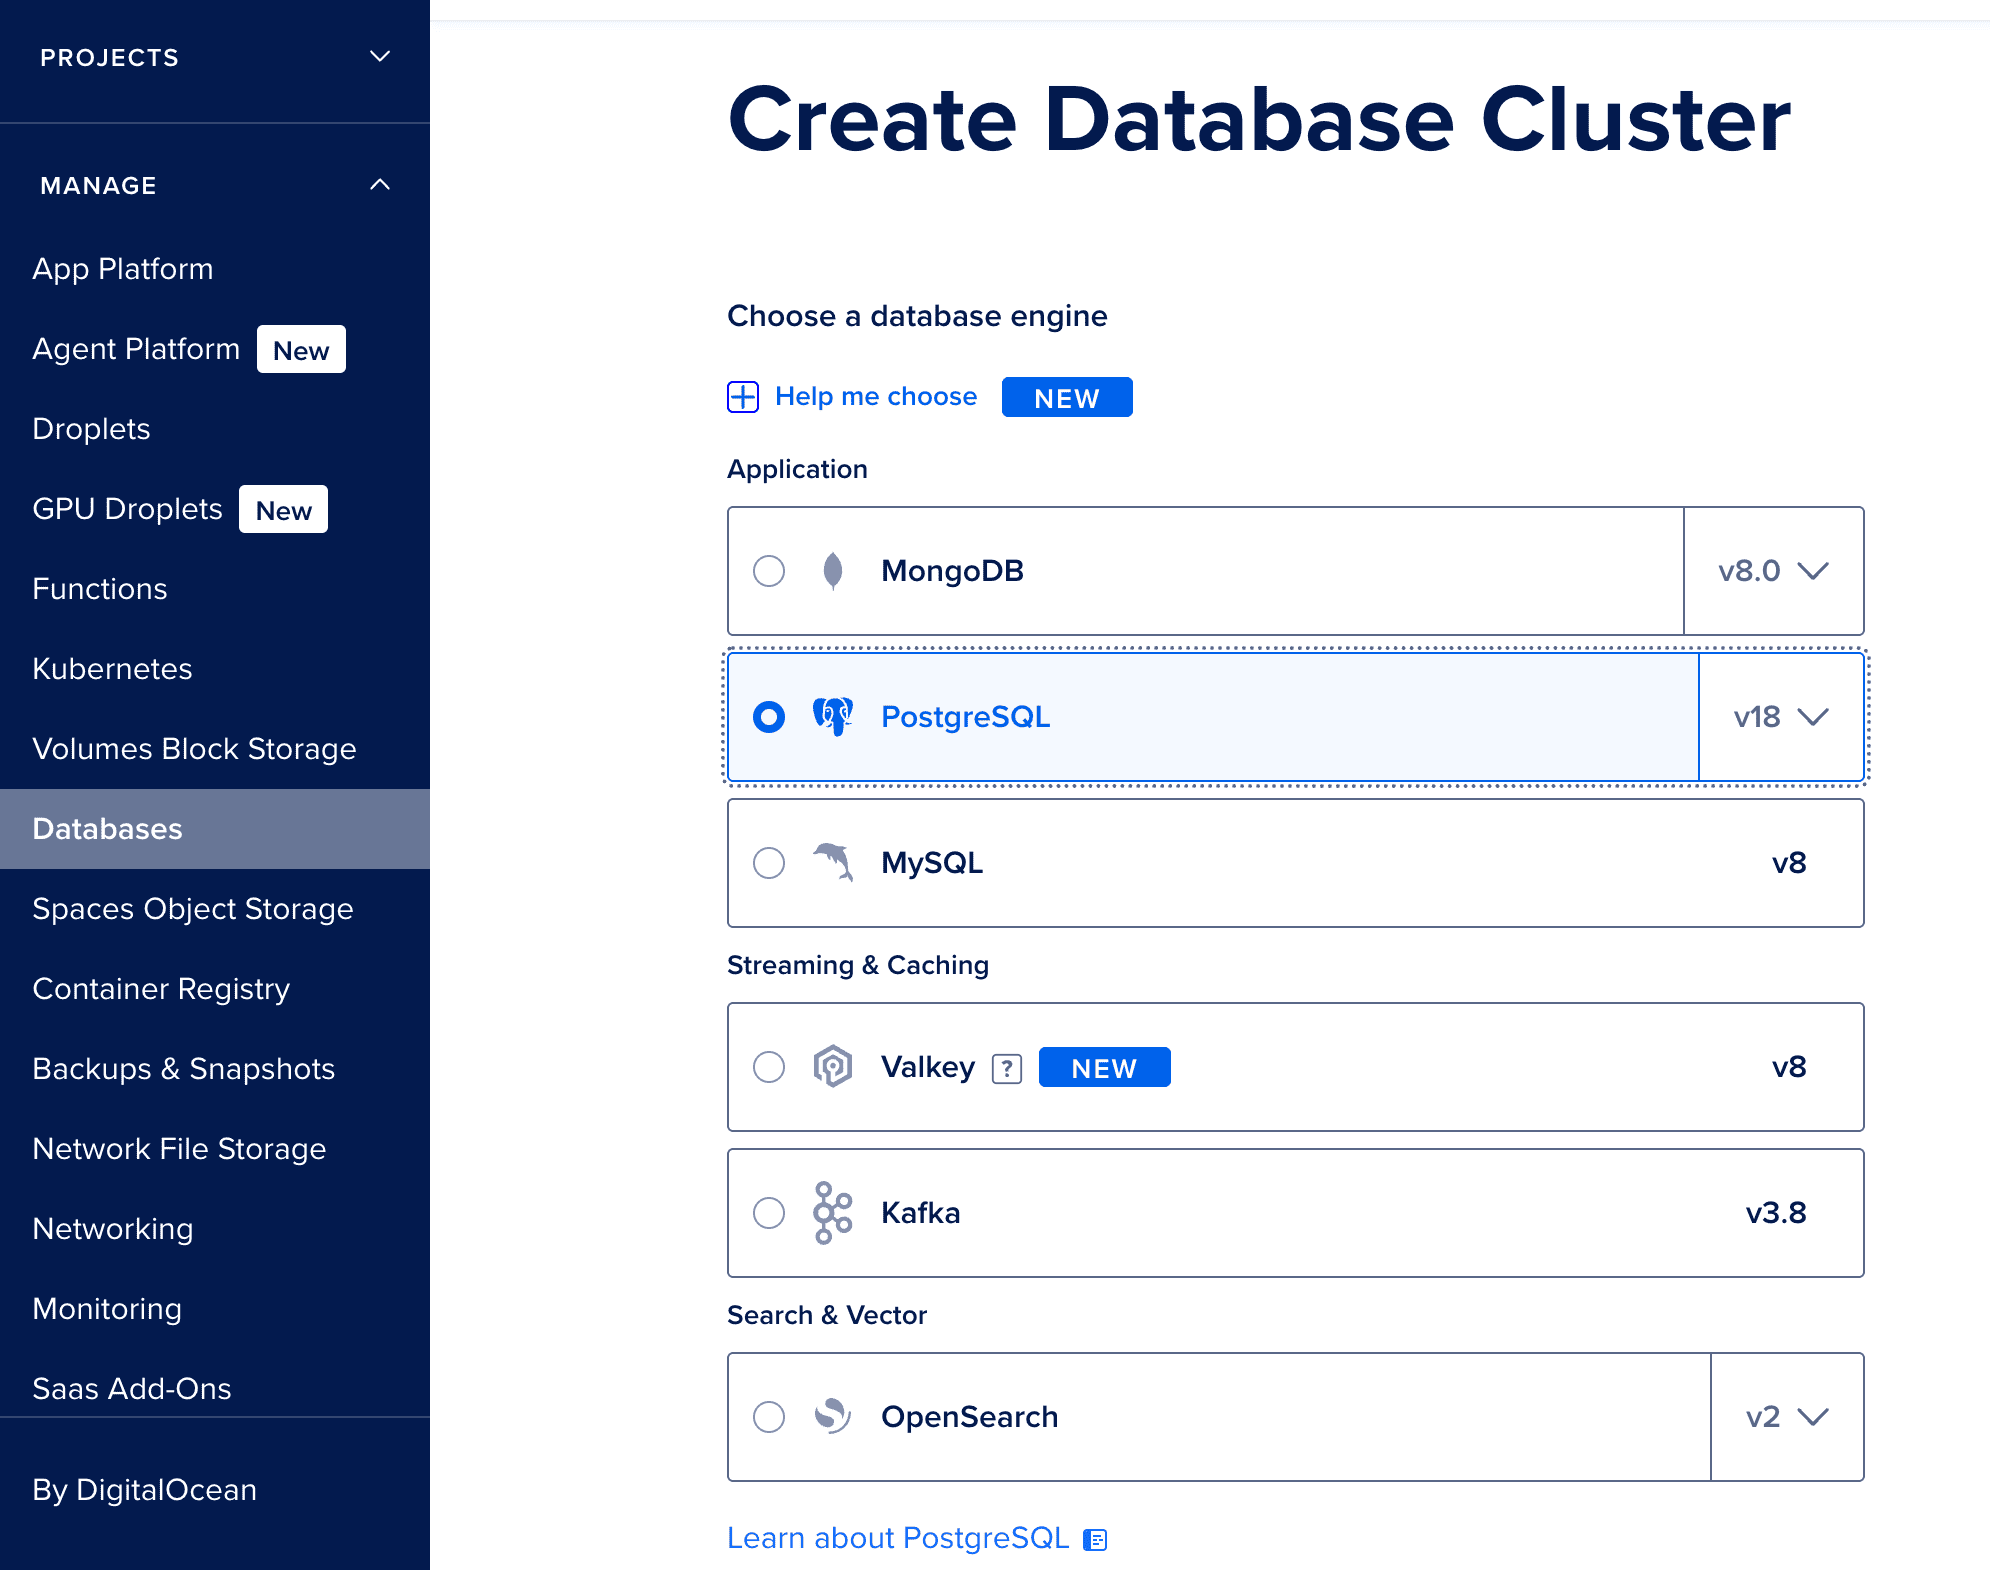
Click Create a Database Cluster
Configure the database:
- Database engine: PostgreSQL
- Version: 15 or later
- Datacenter region: Same as your Kubernetes cluster
- VPC Network: Same VPC as your Kubernetes cluster
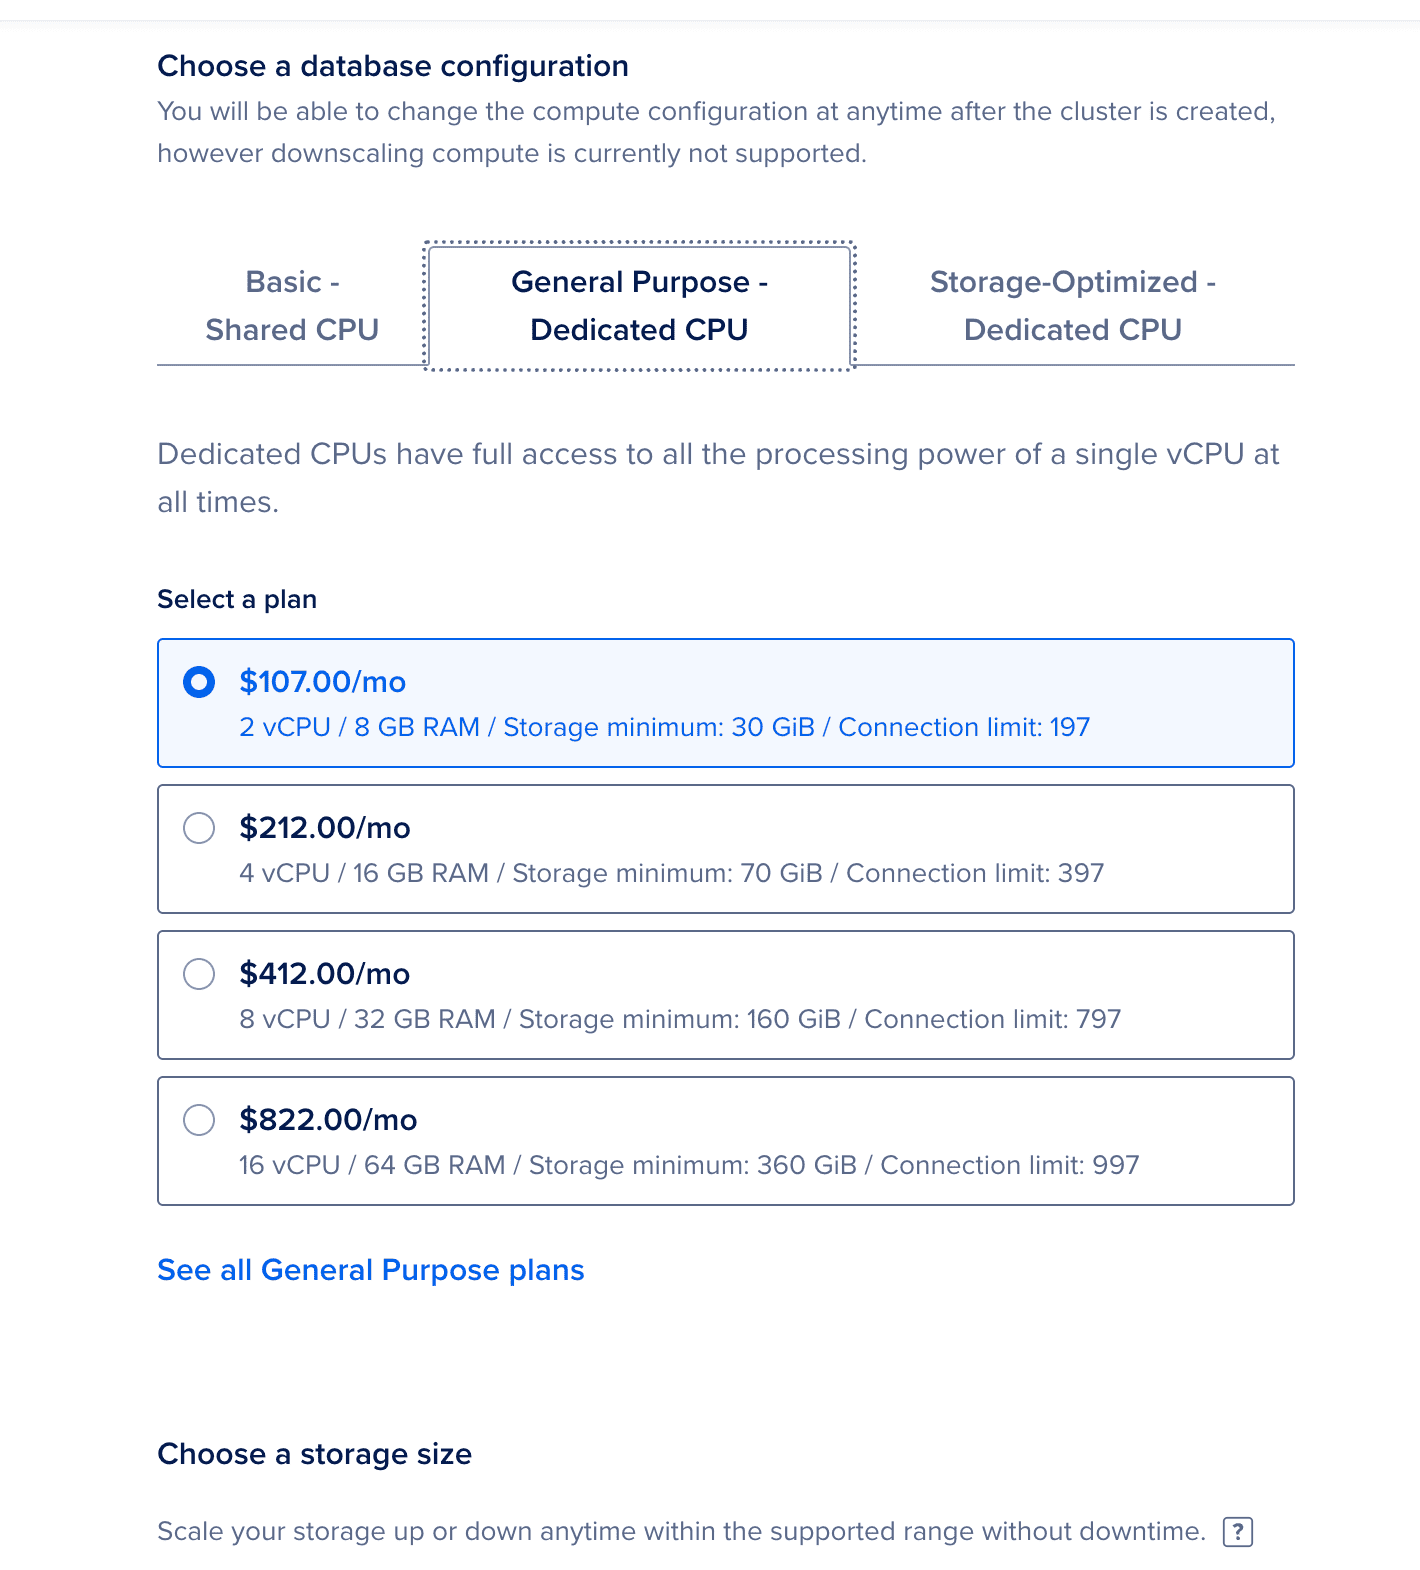
- Database configuration:
- Node plan: Start with
db-s-1vcpu-1gb(1 vCPU, 1GB RAM, 10GB disk) - Standby nodes: 1 (for high availability)
- Node plan: Start with
- Database cluster name:
openobserve-db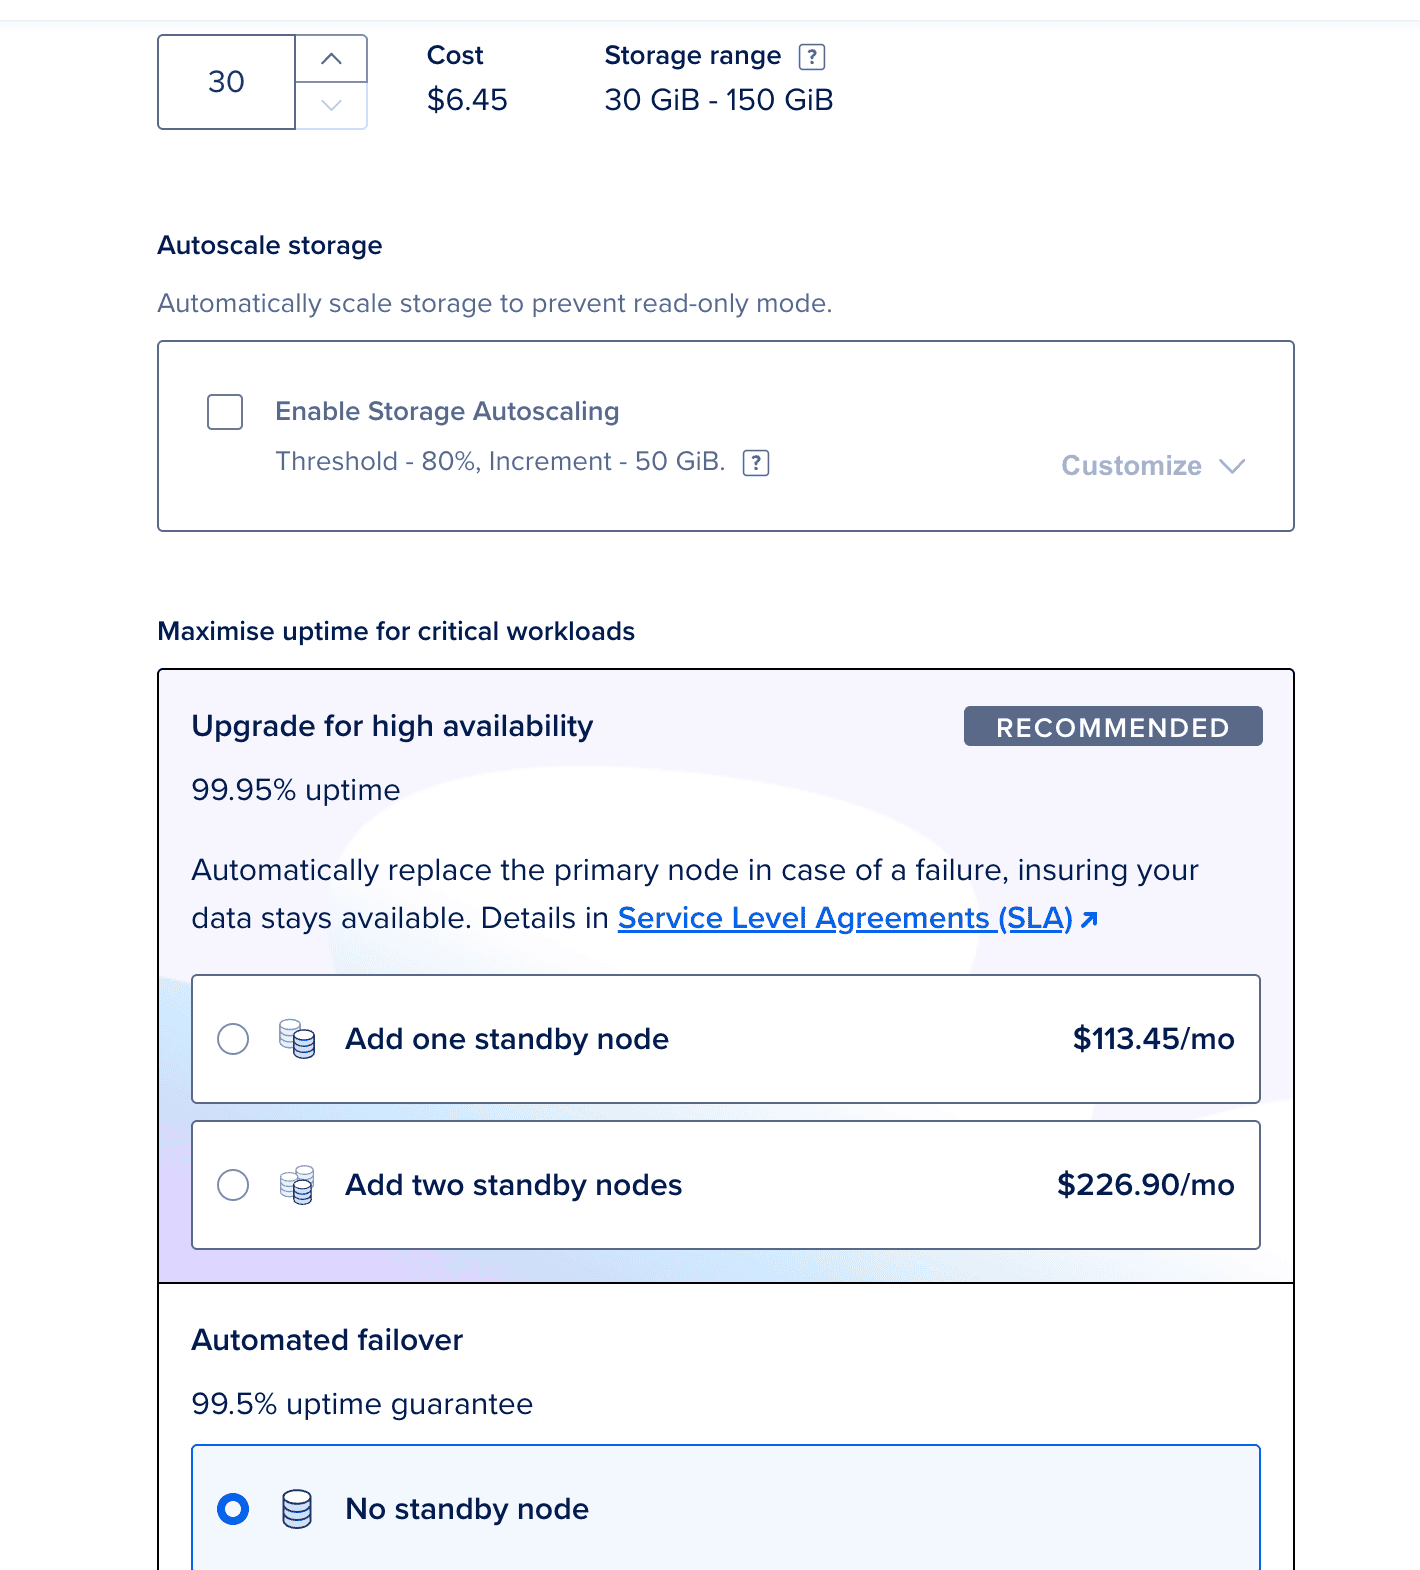
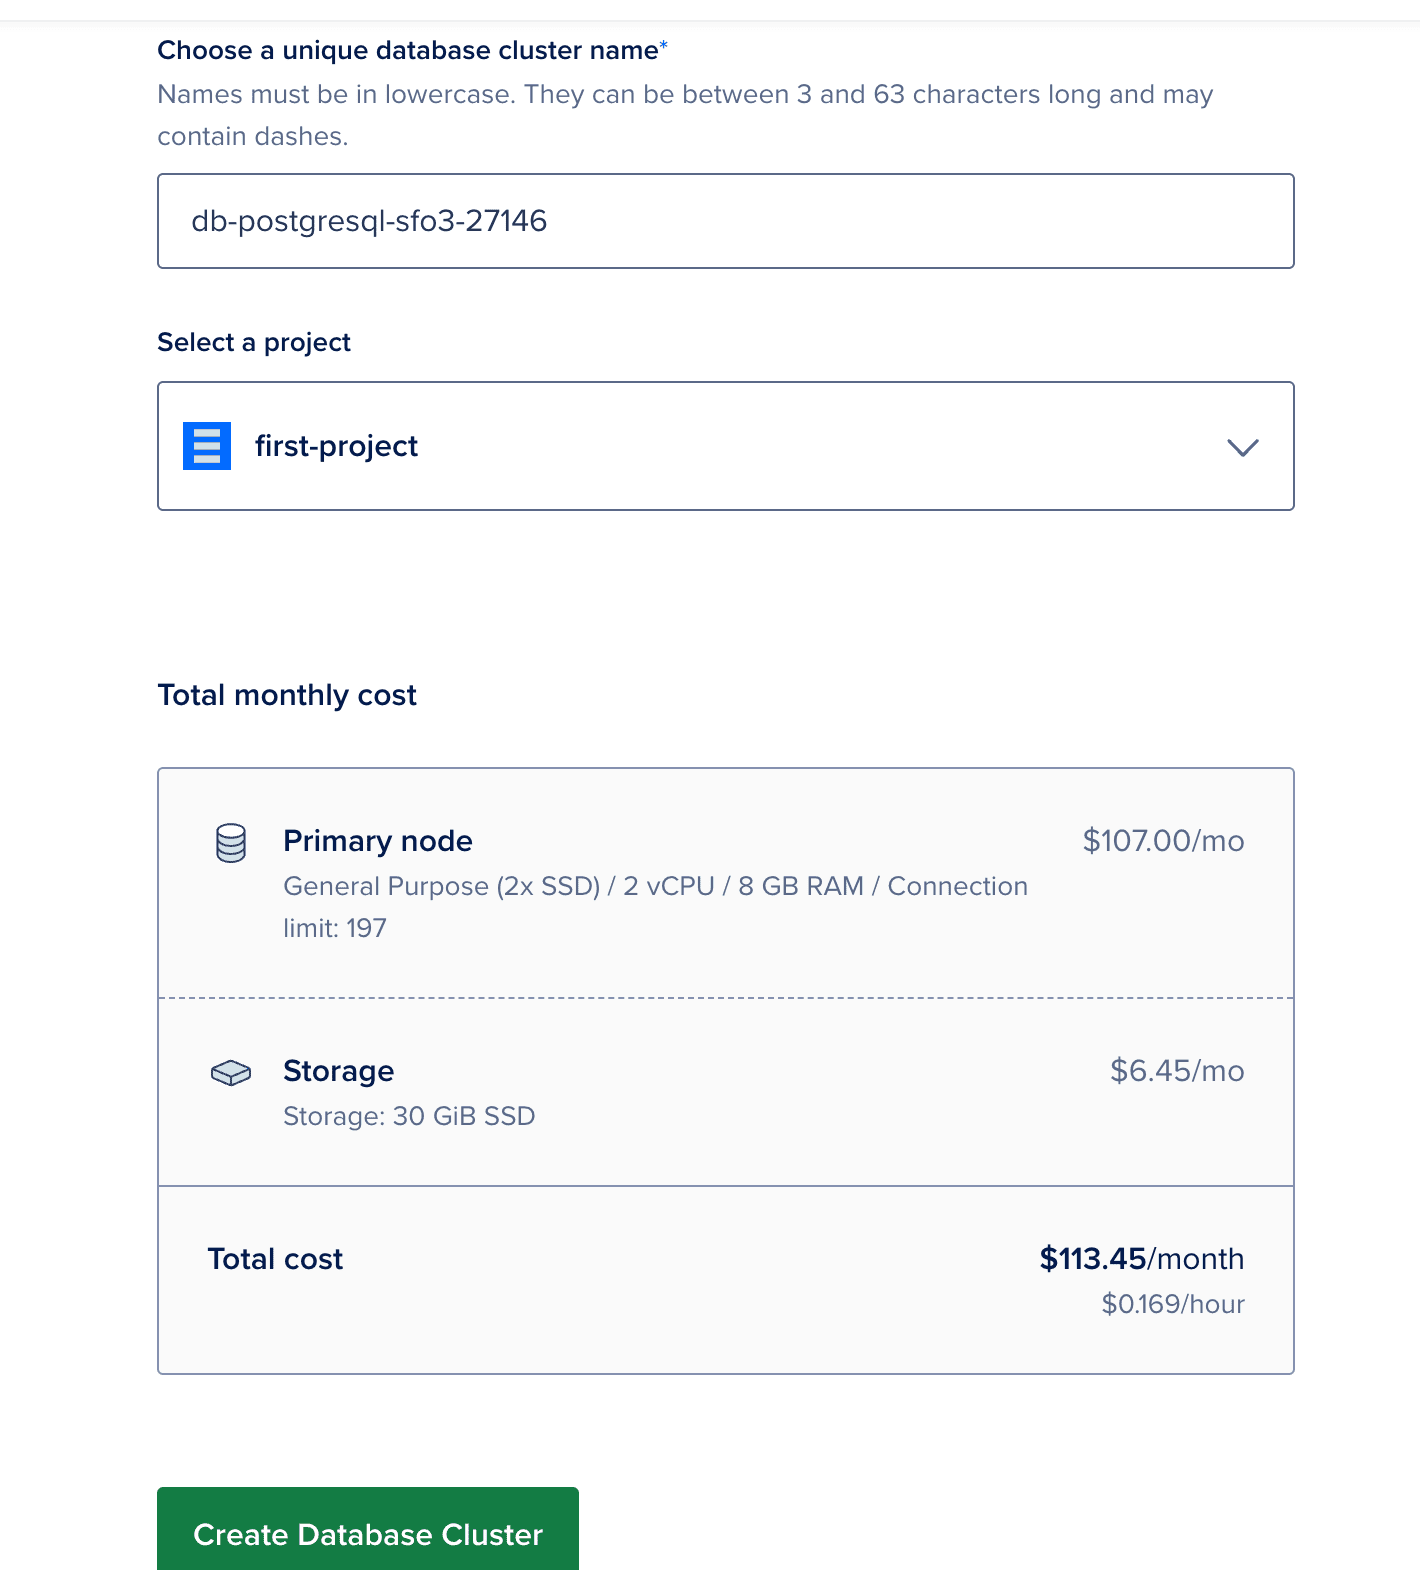
Click Create a Database Cluster
Database provisioning takes 5-7 minutes.
Configure Database Access
Once created:
- Go to the database cluster's Settings tab
- Under Trusted Sources, add your Kubernetes cluster:
- Select Resources
- Choose your
openobserve-cluster - This allows pods in your cluster to access the database
Create Database and User
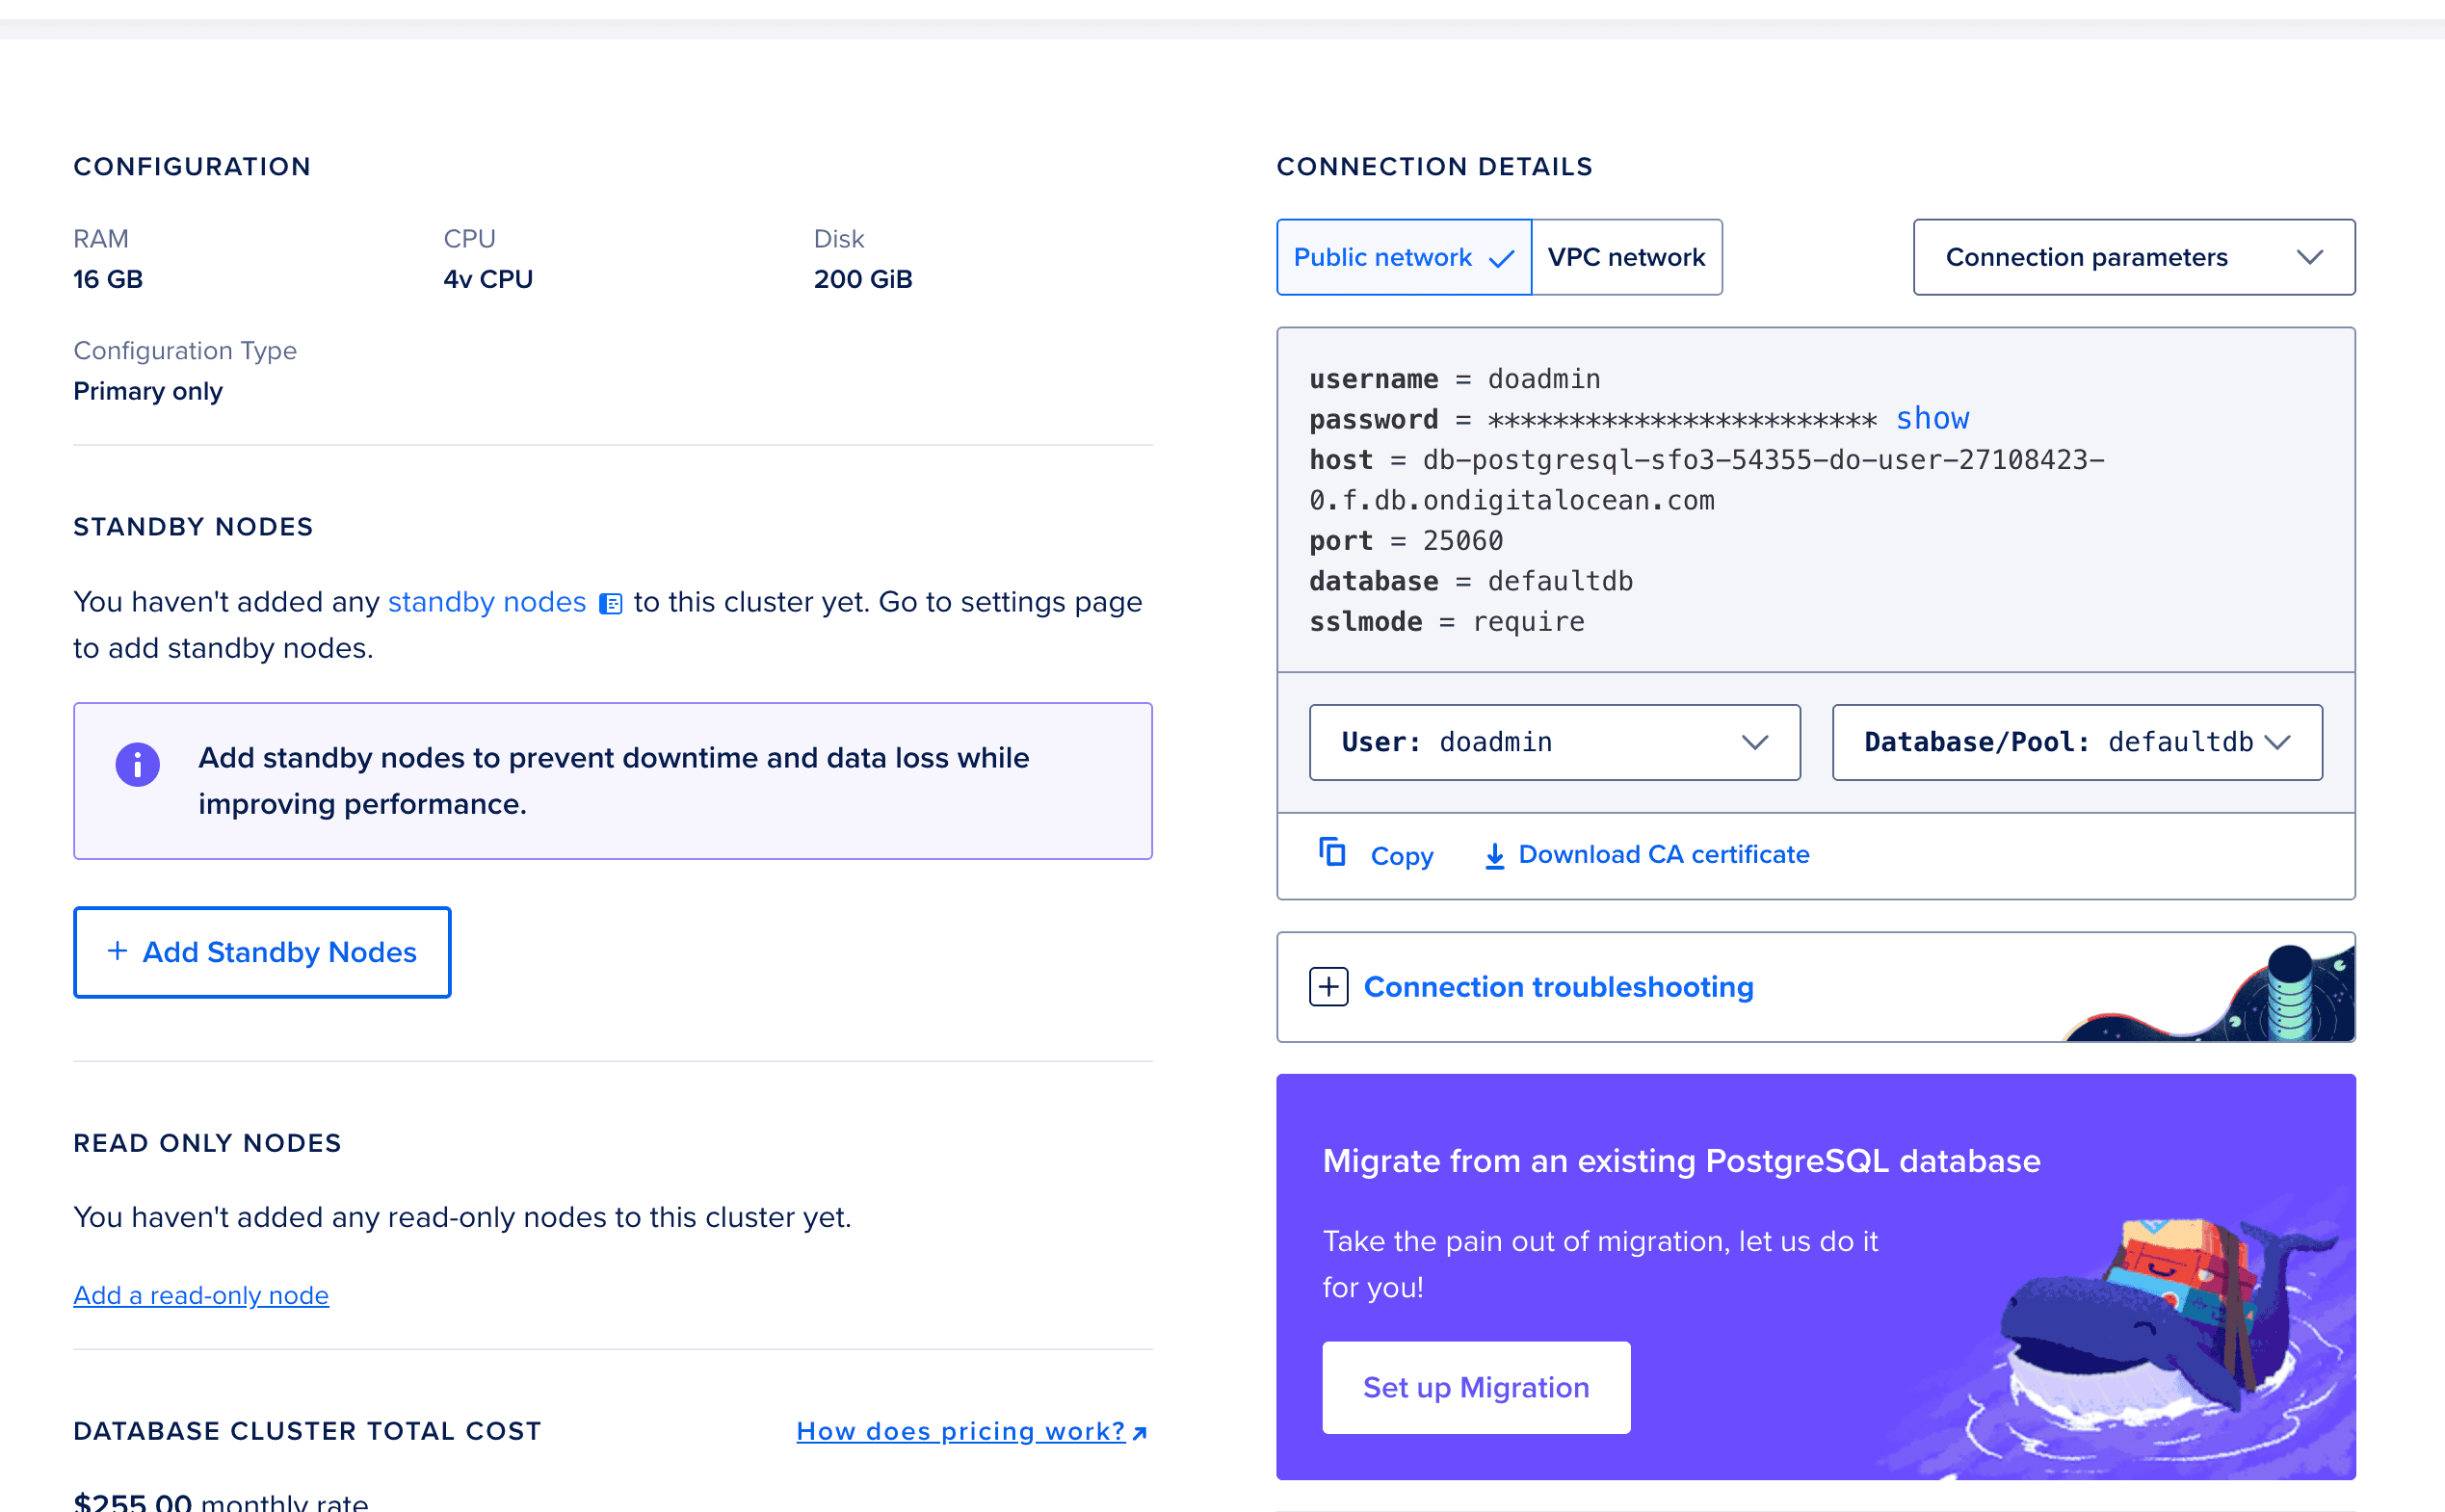
- Go to the Overview tab
- Copy the details as shown in below
- Create a dedicated user (recommended):
- Username:
openobserve_user - Click Add
- Copy the generated password securely
- Username:
Note Connection Details
From the Connection Details section, note:
- Host: The internal hostname (e.g.,
openobserve-db-do-user-xxxxx-0.xxx.db.ondigitalocean.com) - Port:
25060 - Database:
openobserve - Username:
openobserve_user - Password: The password you copied earlier
- SSL Mode:
require
Step 4: Prepare Helm Values Configuration
OpenObserve provides a Helm chart for Kubernetes deployments. We'll customize the values.yaml to use our DigitalOcean resources.
Add OpenObserve Helm Repository
helm repo add openobserve https://charts.openobserve.ai
helm repo update
Get Default Values
You can get the values.yaml from the official repository.
Modify values.yaml
Edit the values.yaml file with your DigitalOcean configurations:
# values.yaml

auth:
  ZO_META_POSTGRES_DSN: "postgres://doadmin:<YOUR_DIGITAL_OCEAN_DB_PASSWORD>@<YOUR_DIGITAL_OCEAN_DB_URL>:25060/<YOUR_DIGITAL_OCEAN_DB_NAME>"
  ZO_S3_ACCESS_KEY: "<YOUR_DIGITAL_OCEAN_ACCESS_KEY>"
  ZO_S3_SECRET_KEY: <YOUR_DIGITAL_OCEAN_SECRET_ACCESS_KEY>"
config:
    ZO_S3_PROVIDER: "s3"
    ZO_S3_SERVER_URL: "<YOUR_DIGITAL_OCEAN_SPACES_URL>"
    ZO_S3_REGION_NAME: "sfo3"
    ZO_S3_BUCKET_NAME: "<YOUR_DIGITAL_OCEAN_SPACE_NAME>"
Security Best Practices
Important: Never commit credentials to version control. Consider using Kubernetes secrets:
# Create a secret for Spaces credentials
kubectl create secret generic openobserve-spaces \
  --from-literal=access-key='YOUR_SPACES_ACCESS_KEY' \
  --from-literal=secret-key='YOUR_SPACES_SECRET_KEY'

# Create a secret for PostgreSQL connection
kubectl create secret generic openobserve-db \
  --from-literal=dsn='postgres://openobserve_user:YOUR_DB_PASSWORD@openobserve-db-do-user-xxxxx-0.xxx.db.ondigitalocean.com:25060/openobserve?sslmode=require'

# Create a secret for root user credentials
kubectl create secret generic openobserve-auth \
  --from-literal=email='admin@yourdomain.com' \
  --from-literal=password='ComplexPassword123!'
Then modify your values.yaml to reference these secrets:
env:
  ZO_S3_ACCESS_KEY:
    valueFrom:
      secretKeyRef:
        name: openobserve-spaces
        key: access-key
  ZO_S3_SECRET_KEY:
    valueFrom:
      secretKeyRef:
        name: openobserve-spaces
        key: secret-key
  ZO_META_POSTGRES_DSN:
    valueFrom:
      secretKeyRef:
        name: openobserve-db
        key: dsn
  ZO_ROOT_USER_EMAIL:
    valueFrom:
      secretKeyRef:
        name: openobserve-auth
        key: email
  ZO_ROOT_USER_PASSWORD:
    valueFrom:
      secretKeyRef:
        name: openobserve-auth
        key: password
Step 5: Deploy OpenObserve
With everything configured, deploy OpenObserve to your cluster:
Install with Helm
# Create a namespace for OpenObserve
kubectl create namespace openobserve

# Deploy OpenObserve
helm install openobserve openobserve/openobserve \
  --namespace openobserve \
  --values values.yaml
Verify Deployment
Check if pods are running:
kubectl get pods -n openobserve
You should see output similar to:
NAME                            READY   STATUS    RESTARTS   AGE
openobserve-5d8f9c6b7d-abc12    1/1     Running   0          2m
openobserve-5d8f9c6b7d-def34    1/1     Running   0          2m
Check the service:
kubectl get svc -n openobserve
Note the EXTERNAL-IP for the LoadBalancer service. This is your OpenObserve endpoint.
View Logs
If you encounter issues:
kubectl logs -n openobserve -l app=openobserve --tail=100
Step 6: Access OpenObserve
Get the LoadBalancer IP
kubectl get svc -n openobserve openobserve -o jsonpath='{.status.loadBalancer.ingress[0].ip}'
Access the UI
Open your browser and navigate to:
http://<LOADBALANCER-IP>:5080
Log in with the credentials you configured:
- Email:
admin@yourdomain.com - Password:
ComplexPassword123!
Post-Deployment Configuration
1. Configure DNS (Recommended)
Point a domain to your LoadBalancer IP:
openobserve.yourdomain.com → <LOADBALANCER-IP>
2. Enable TLS/SSL
For production, always use HTTPS. Options include:
Option A: Using cert-manager and Let's Encrypt
# Install cert-manager
kubectl apply -f https://github.com/cert-manager/cert-manager/releases/download/v1.13.0/cert-manager.yaml

# Create a ClusterIssuer (letsencrypt-prod.yaml)
kubectl apply -f - <<EOF
apiVersion: cert-manager.io/v1
kind: ClusterIssuer
metadata:
  name: letsencrypt-prod
spec:
  acme:
    server: https://acme-v02.api.letsencrypt.org/directory
    email: admin@yourdomain.com
    privateKeySecretRef:
      name: letsencrypt-prod
    solvers:
    - http01:
        ingress:
          class: nginx
EOF
Update your values.yaml to enable ingress with TLS:
ingress:
  enabled: true
  className: nginx
  annotations:
    cert-manager.io/cluster-issuer: "letsencrypt-prod"
  hosts:
    - host: openobserve.yourdomain.com
      paths:
        - path: /
          pathType: Prefix
  tls:
    - secretName: openobserve-tls
      hosts:
        - openobserve.yourdomain.com
Option B: Using DigitalOcean Load Balancer with certificate
Configure SSL certificate in the DigitalOcean Load Balancer settings.
## Monitoring Your Deployment

### Check Resource Usage

```bash
# CPU and Memory usage
kubectl top pods -n openobserve

# Storage usage
kubectl get pvc -n openobserve
Scale Based on Load
If you need more capacity:
# Manual scaling
kubectl scale deployment openobserve -n openobserve --replicas=4

# Or enable autoscaling in values.yaml
autoscaling:
  enabled: true
  minReplicas: 2
  maxReplicas: 5
  targetCPUUtilizationPercentage: 70
Troubleshooting Common Issues
Pods Not Starting
Check events:
kubectl describe pod -n openobserve <pod-name>
Common causes:
- Incorrect database credentials
- Spaces access key issues
- Insufficient resources
Cannot Connect to Database
Verify:
- Database is in the same VPC as Kubernetes cluster
- Kubernetes cluster is added to trusted sources
- Connection string is correct with SSL mode
Upgrading OpenObserve
To upgrade to a newer version:
# Update Helm repository
helm repo update

# Check available versions
helm search repo openobserve

# Upgrade
helm upgrade openobserve openobserve/openobserve \
  --namespace openobserve \
  --values values.yaml \
  --version <new-version>
Conclusion
You now have a production-ready OpenObserve deployment on DigitalOcean! This setup provides:
- Scalability: Kubernetes autoscaling and managed services
- Reliability: High availability with multiple replicas
- Performance: S3-compatible object storage and managed PostgreSQL
- Security: VPC networking and SSL/TLS encryption
- Cost-effectiveness: Pay only for resources you use
Next steps to consider:
- Configure data ingestion from your applications
- Set up dashboards for your key metrics
- Configure alerting rules
For more advanced configurations and best practices, check out the OpenObserve documentation.
Get Started with OpenObserve Today!
Sign up for a 14 day trial Check out our GitHub repository for self-hosting and contribution opportunities
About the Author
Chaitanya Sistla

Chaitanya Sistla is a Principal Solutions Architect with 17X certifications across Cloud, Data, DevOps, and Cybersecurity. Leveraging extensive startup experience and a focus on MLOps, Chaitanya excels at designing scalable, innovative solutions that drive operational excellence and business transformation.